How to Auto-update Connector Software
You can configure the IBM Security Connector to automatically poll Privileged Access Service for software updates and install them. The connector is enabled to poll automatically by default. You can also specify the auto-update time windows.
To configure software auto-update options:
-
Log in to the IBM Security Connector server.
-
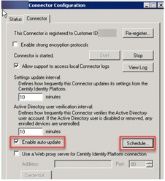
Open the IBM Security Connector Configuration window.
-
Use the Enable auto-update check box to enable/disable the auto-update.
-
Use the Schedule button associated with the Enable auto-update option to configure the auto-update time window.
-
Click the Apply button.
To check for and install the connector
-
Click the Windows Start menu and open the IBM Security Connector Configuration Program.
-
Click Yes to allows this program to make changes to the computer.
-
In the lower left of the Status tab, right-click the update icon and select Update.
The connector updates and then displays a message indicating that the software is up to date.