Using Manual Integration
For Verify Privilege Vault users to use secrets from the Verify Privileged Identity Platform, their Verify Privilege Vault and Platform accounts must share the identical login username. This is true for any administrative accounts used for setting up the Verify Privileged Identity Platform and Verify Privilege Vault.
Verify Privileged Identity Platform users working with a Verify Privilege Vault Cloud deployment (and URL) will not see Remote Access in the top-level left navigation. The PRA engine is automatically enabled to launch remote access for secrets that are based on appropriate templates.
New customers who sign up for a Platform trial are assigned full administrator privileges within both the Verify Privileged Identity Platform and the integrated Verify Privilege Vault Cloud.
When a new Verify Privileged Identity Platform user account is created and that user first logs in to the platform, the Platform checks for an existing corresponding account (by username, domain, and UPN) in Verify Privilege Vault. If a corresponding account already exists in Verify Privilege Vault, the Platform account is linked to the Verify Privilege Vault account automatically. If there is no corresponding account in Verify Privilege Vault, Verify Privilege Vault automatically creates one and links it to the Platform account. The two accounts appear to the user as a single account.
Retrieve the Platform Integration Credentials
-
Log in to the Verify Privileged Identity Platform with an administrative account.
- Click Settings from the left navigation, then select Authentication Profiles.
-
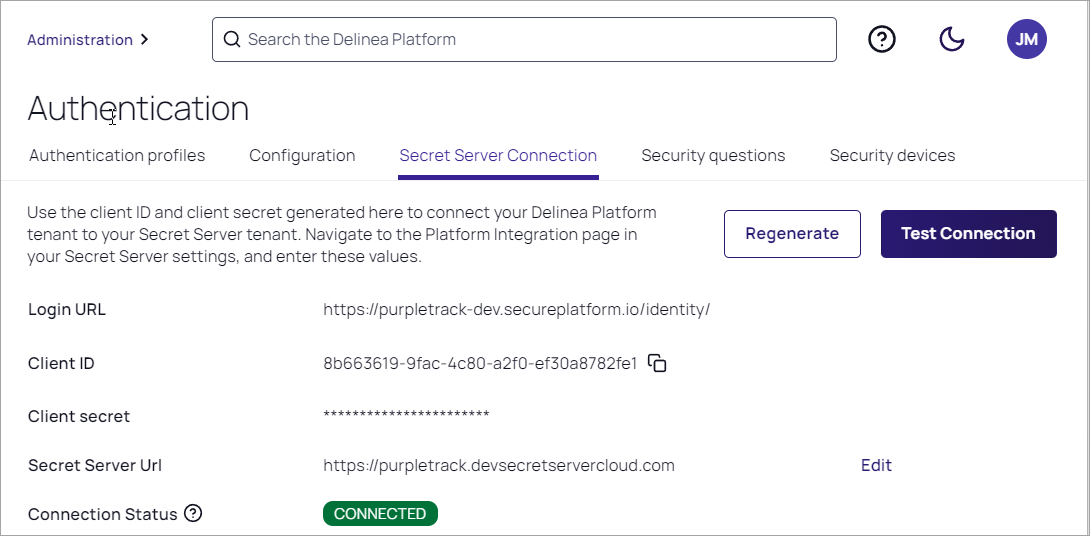
Click the Secret Server Connection tab.
-
Copy the Client ID and Client Secret and save them for use in the next section.
-
In the Secret Server URL field, add your Verify Privilege Vault URL. For example,
https://<tenant>.secretservercloud.com. -
Click Save.
If you need to regenerate the credentials (Client ID and Client Secret), please contact technical support.
To test the connection, click Test Connection. The connection status messages depend on your configuration, but could include Connection was successful, Integration was not configured, Integration URLs do not match, or Did not receive an integration response.
Enable Platform Integration in Verify Privilege Vault
-
Log in to Verify Privilege Vault with an administrative account.
-
Select Administration > Tools & Integrations.
-
Under Tools & Integrations, click Platform Integration.
-
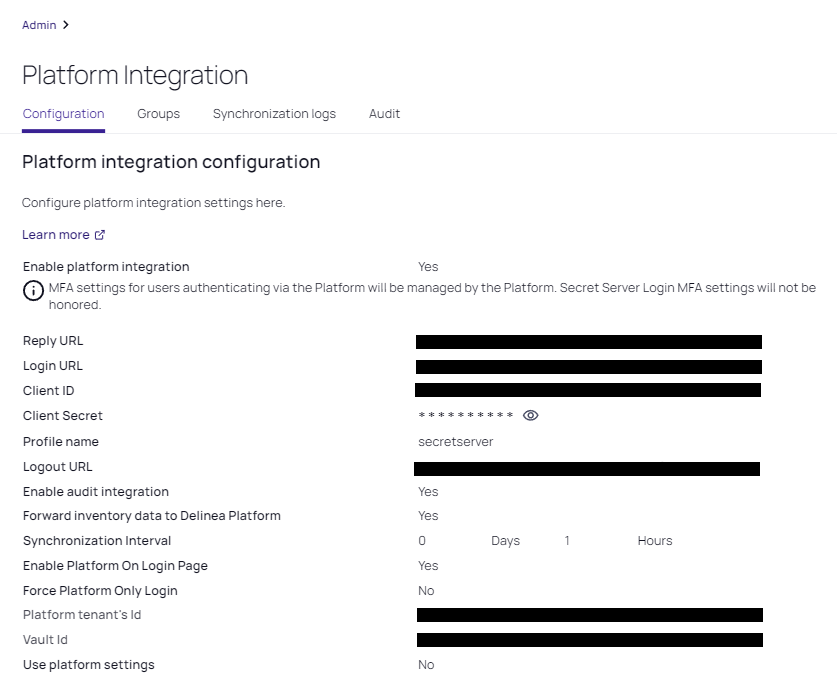
Click the Configuration tab.
-
Fill in the fields as follows:
- Reply URL: Pre-filled
- Login URL: The login URL displayed on the Platform under Settings > Secret Server Connection; for example,
https://<hostname>.delinea.app/identity. - Client ID: The Client ID you copied in the previous steps
- Client Secret: The Client Secret you copied in the previous steps
- Profile Name: Pre-filled
- Logout URL: The logout URL endpoint for the platform; for example,
https://<hostname>.delinea.app/identity/api/Security/Logout - Enable audit integration: Yes. In future releases, this setting will probably not be optional.
- Forward inventory data to Verify Privileged Identity Platform: Yes. In future releases, this setting will probably not be optional.
- Synchronization Interval: Sets the interval for the Synchronize Platform function
- Enable Platform on login page: If Yes, the Platform log in option appears on the Verify Privilege Vault log in page. If No, the Platform log in option is still accessible but not on the Verify Privilege Vault log in page.
- Force Platform Only Login: Redirects to Platform login
- Platform Tenant's ID: The Platform tenant's unique identifier (read only)
- Vault ID: The identifier for the Verify Privilege Vault instance (read only)
- Use Platform settings: Yes enables Unified Mode which consolidates role, user, and group management in the platform. After the systems are in sync, this is the last step of the Verify Privilege Vault upgrade to the platform. Once enabled, integral areas of the product are consolidated and this option cannot be disabled.
- Select the Enabled checkbox.
- Click Save.
Verify the Integration on the Platform
- Log in to the Verify Privileged Identity Platform. If you're already logged in, log out, then log back in.
- Navigate to the All secrets page.
- The All Secrets page displays all of your secrets from Verify Privilege Vault, now shared with the platform.
Verify the Integration in Verify Privilege Vault
-
Sign out of Verify Privilege Vault Cloud and return to the login page.
-
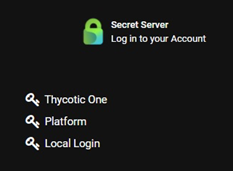
When prompted for an identity provider, select Platform.
-
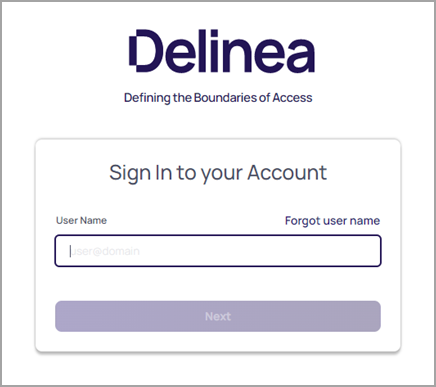
The Verify Privileged Identity Platform authentication screen displays.
-
Sign in with the credentials for the newly-created Verify Privileged Identity Platform account that maps to your Verify Privilege Vault account.
-
If you can log in successfully, your upgrade from Verify Privilege Vault Cloud to the Verify Privileged Identity Platform is complete.
-
Refresh the Verify Privileged Identity Platform page. The Secrets tab appears in the left navigation, and the browser launcher appears in Verify Privilege Vault.
Because cloudadmin is not your Verify Privilege Vault administrator account, while you are logged in as cloudadmin you will not be able to see your existing secrets in Verify Privilege Vault or use your existing Verify Privilege Vault administrator permissions. This is expected behavior and it does not indicate a failed integration. Do not change the cloudadmin username to match an existing Verify Privilege Vault username, because that will break the synchronization between the Platform and Verify Privilege Vault.
Link Verify Privileged Identity Platform and Verify Privilege Vault Groups
When a Platform user with administrator permissions in both Platform and Verify Privilege Vault identifies an existing Platform group they want to link to a Verify Privilege Vault group, the administrator provides Verify Privilege Vault with the name of the Platform group to be linked. Verify Privilege Vault then retrieves the critical information about the Platform group and uses it to automatically generate a new Verify Privilege Vault group that is based on, linked to, and named for the original Platform group.
These linked, automatically generated Verify Privilege Vault groups are identified in Verify Privilege Vault as Enabled Platform Groups. For Enabled Platform Groups, Verify Privilege Vault manages the Verify Privilege Vault permissions, and Platform manages the Platform permissions. Platform also manages the group memberships, so all members of Enabled Platform Groups are Platform accounts.
Platform groups that can be linked to Verify Privilege Vault groups this way include local as well as non-local Platform groups, such as groups from external AD directories.
An Enabled Platform Group can coexist in Verify Privilege Vault with a Verify Privilege Vault-only group by the same name. The two groups remain distinct, and only one is identified as an Enabled Platform Group.
The group linking process moves in one direction: from the Platform to Verify Privilege Vault. So although you can link an existing Platform group to a new Enabled Platform Group in Verify Privilege Vault, you cannot link an existing Verify Privilege Vault group to a Verify Privileged Identity Platform group.
In this example, we will use Platform Test Group as the group name.
-
Click Settings from the left navigation, then select Administration below Secret Server.
-
On the Secrets Administration page, click Platform Upgrade.
- Click the Groups tab.
- Next to Enabled Platform Groups, click Edit.
- In the Select Groups box, enter the name of a Platform group that you want to sync to a new Verify Privilege Vault group. In this example, Platform Test Group is the group name. Verify Privilege Vault then queries the Platform identity service and when it finds the group named Platform Test Group, the group's name is displayed beneath the Search field with a check box next to it.
- Select the box next to Platform Test Group.
- Click Save.
After the Platform and Verify Privilege Vault groups are linked, you can find the new Verify Privilege Vault group named Platform Test Group from anywhere in Verify Privilege Vault where groups are referenced. When you click to open Platform Test Group, the group page opens with a banner at the top stating, The members of this group are managed by Platform.
Synchronize Verify Privileged Identity Platform and Verify Privilege Vault Groups
After the groups are linked, they are synchronized automatically at set intervals. The first time you link a Platform group to a Verify Privilege Vault group, the periodic synch might not happen immediately, so you might not see the Platform accounts in the Verify Privilege Vault group right away. To force the groups to synch:
-
Click Settings from the left navigation, then select Administration below Secret Server.
-
On the Secrets Administration page, click Platform Upgrade.
- Click the Groups tab.
-
Click Sync Now.
The group synchronization process moves in one direction: from the Platform to Verify Privilege Vault. Existing Platform groups synch to their linked Enabled Platform Groups in Verify Privilege Vault, but existing Verify Privilege Vault groups do not synch to Platform groups.