Group Management
Every Computer Group is divided into Groups and Users. Both Groups and Users in this context refer to local accounts and any Azure AD synchronized resources as part of a particular Computer Group.
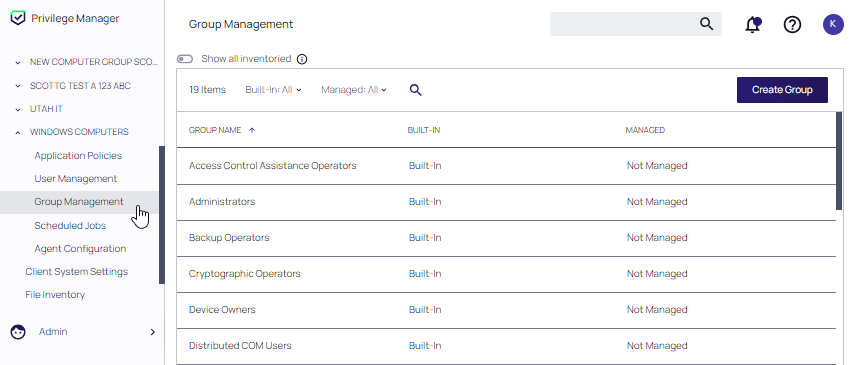
The Computer Group page lists all local groups on this set of computers, and provides a high-level overview of the selected computer group based on Local Users, Local Groups, and the number of computers in the group.
When an agent registers, Local Security will automatically discover the local groups that exist on each machine.
The Group Management and User Management pages have been configured to load faster by showing the list of managed and built-in users and groups only. Inventoried users and groups will no longer appear by default unless there are less than 200 workstations in that computer group.
To show all inventoried users, enable Show all inventorized). By default, this toggle will be off and just show built-in users, as well as managed local users.
You can still manage any group or user on those workstations by clicking Create User or Create Group available in the top right of their respective tables.
Refer to Managing Local Groups.
Creating a New Local Group
To create a new Group,
-
Under your Computer Group, select Group Management.
-
Click Create Group.
-
Enter a name for your new group.
-
Click Create. The Group Details page is displayed. The Manage Group switch is by default set to Yes.
-
Click Add Member.
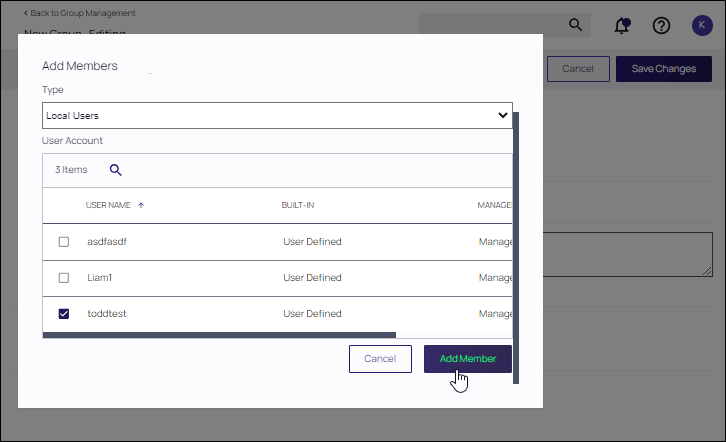
-
From the Type drop-down, select either
- Domain User
- Domain Group
- Local Users
- Local Users (Manual Entry)
- Local Users (Regex)
-
On the Add Member dialog, select from the available resource items.
for Domain User or Domain Group. For Local Users, select the user from the list as shown in the example image below. Local Users (Manual Entry) allows you to enter specific local user names.
Local Users (Regex) allows you to enter specific local user names with Regex expressions.You must use specific and restrictive regex. We cannot guarantee that your expression will never include an unintended user. Please validate the expression yourself with one of the many online regex testers, and check group members regularly.
-
Click Add Member.
-
The User Group Details page is displayed. Review all settings prior to clicking Save Changes.
Refer to Manage Local Groups.
Managing Local Groups
Managing a local group means that you determine which user accounts are in the group. In other words, if a group is being managed, the group membership will remain static and will no longer be able to be updated directly on the endpoint. Before adding users to any group, make sure you really want all those users in that particular group. Any exact group membership setting is rolled out to ALL endpoints in that computer group.
About Sources and Local Groups
Each local group on a machine should be managed by a single source only.
Conflicts occur when the same local group is managed by more than one Privilege Manager policy, or by Privilege Manager and another tool at the same time. This can happen because:
-
A machine belongs to multiple computer groups, and a policy in each group targets the same local group
-
An external tool such as Microsoft Intune or Group Policy (GPO) is also managing that group.
When multiple sources manage the same local group, the User and Group Management interface may fail to display its contents and drift from the configuration in Privilege Manager may occur.
Example: A machine belongs to both Workstations and Finance computer groups, and each computer group has a policy managing the local administrators group, while a GPO also adds members to it. This conflict can break the interface and/or create a circular chain of events leading to intermittent configuration drift.
To resolve: Make sure only one source manages a given local group per machine. Remove the extra Privilege Manager policies, and stop managing that group with external tools (Intune, GPO, etc.).
Group Details
If a local group is not managed, the Manage Group is set to No. To manage the group, set Manage Group to Yes and click Save Changes, then Yes to confirm. Changes to these settings may take up to 15 minutes to update on your endpoints.
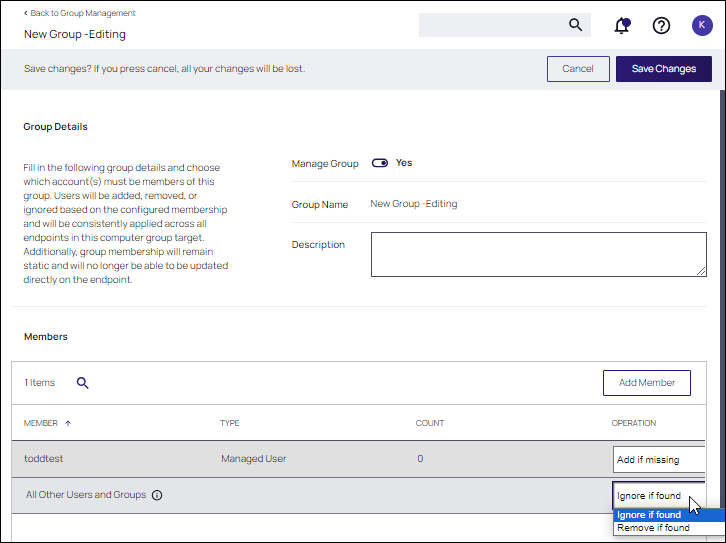
Members
When managing a group, existing members and any that have been added to the policy will appear in the Members table. Users will be added, removed, or ignored based on the configured membership and will be consistently applied across all endpoints in this computer group target.
Once saved, group membership is permanently defined. Updates made directly on the endpoint that break this policy will be immediately reverted.
-
From the drop-down, choose which operation to perform if an account (member) is found on the endpoint: Ignore if found, Add if missing, Remove if found.
-
To support large groups of endpoints that have varying requirements for group membership of the same group being managed in the same Device collection, a secondary level of membership can be defined, using the All Other Users and Groups. This setting applies a final filter to the entire group.
The result of applying All Other Users and Groups with current member settings is shown in the table.
Members cannot be removed from a policy until the account is removed from all endpoints. Change the policy to remove the user, if found prior to removing a user with Remove if found.
| All Other Users and Groups Setting | Member Setting | Result |
|---|---|---|
| Remove if found | Remove if found | Instantiates the existing removal of indicated members from the group |
| Ignore if found |
If this member is found in the group on the agent endpoint, they will remain there and will not be removed. This scenario is only supported in agent versions 12.0.4 and higher. |
|
| Add if missing |
Adds a new member to the group. |
|
| Ignore if found | Remove if found | Sets the member to a removal state. |
| Ignore if found | If this member is found in the group on the agent endpoint, they will remain there and will not be removed. | |
| Add if missing | Adds a new member to the group. |
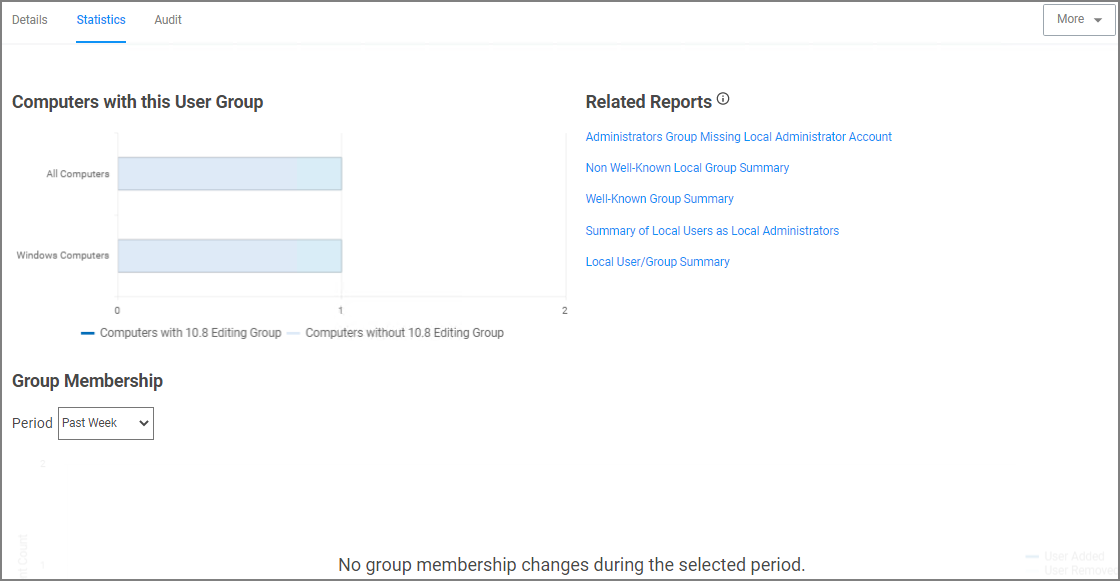
Statistics tab
The Statistics tab for a local group highlights some quick visual statistics and links you to relevant reports based on key factors like how many computers from your network are included in this group and whether there have been changes made to the group's membership within the specified period. Click on these graphs to drill down into more details.
The reports in the Related Reports sections are scoped to only include endpoints in the current computer group. To view reports across all computers, go to the Reports section of the product.
Audit tab
The Audit tab is where you will find an audit record of all membership additions and deletions that have been made to your local groups.
When the agent makes a change to the group based on how the user has configured the group in Verify Privilege Manager, that change is recorded in Audit, as a user is Added or Removed.
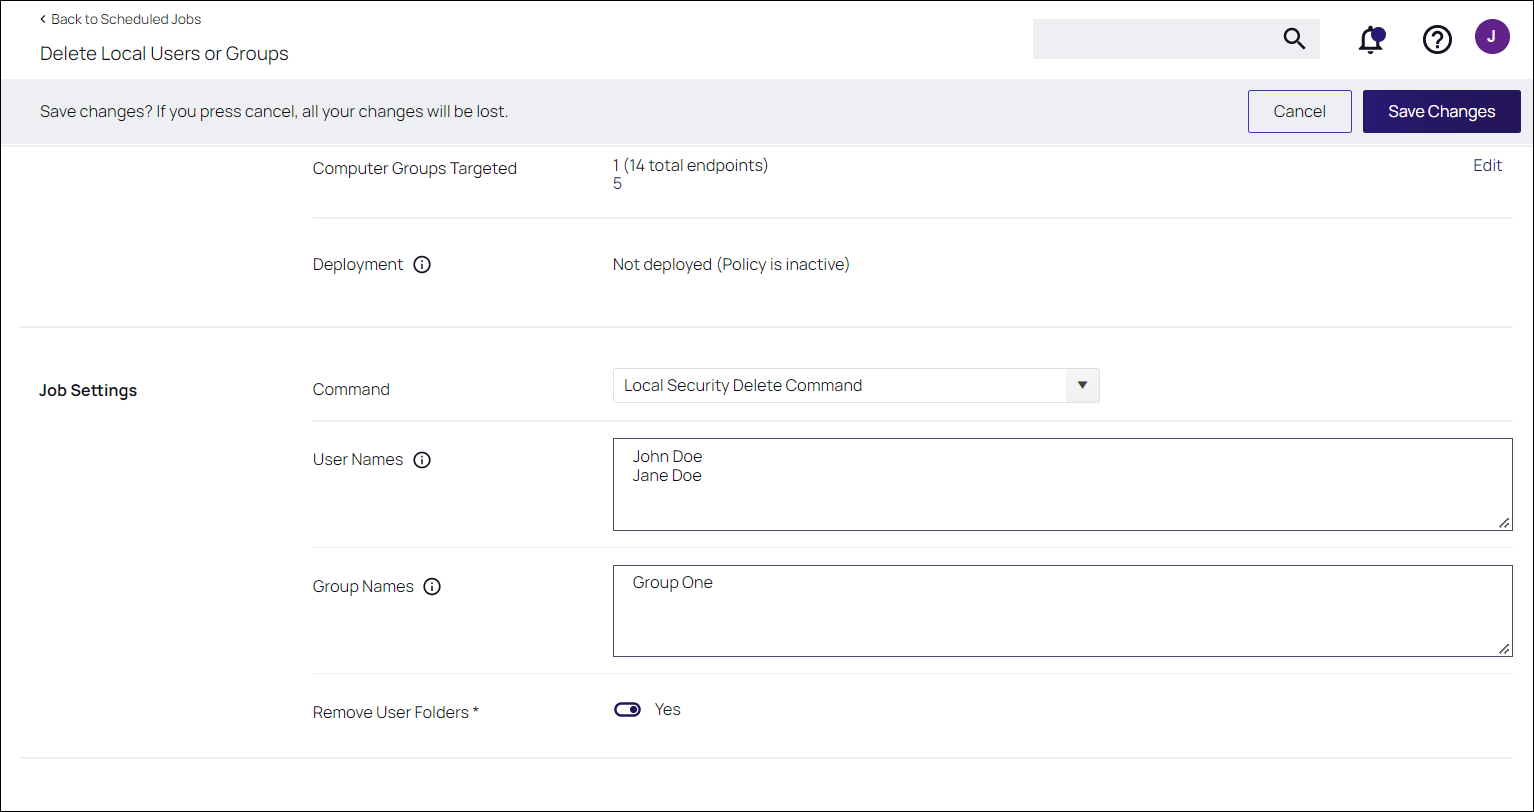
Delete Local Users and Groups
Verify Privilege Manager allows you to delete local User Names and Group Names via the Scheduling function. You can also delete user folders; the Remove User Folders switch (set to Yes by default) deletes the associated user folders in c:\users.
To delete User Names and Group Names:
-
From the left navigation pane of the Verify Privilege Manager console, select Computer Groups.
-
From a computer group, select Scheduled Jobs.
-
Click Create Scheduled Job.
-
From the Create Scheduled Job window, enter a Name and Description – ensuring each is meaningful and aligned with the task you are scheduling.
-
From the Client Command drop-down list box, select Local Security Delete Command.
-
Click Create.
-
Scroll to the Job Settings section of the page that opens, entering text in the appropriate User Names and Group Names fields. Enter one name per line, pressing ENTER to add multiple entries in one or both fields.
Neither the User Names nor Group Names fields are case sensitive; however, you must spell each name correctly. For example, entering JOHN DOE, john doe, or John DoE will delete user: John Doe. Entering John Doee will not remove the John Doe user. Also, you cannot append the computer name_domain name to a user name; PMQA1Z-1234-1\JohnDoe123 will not remove the JohnDoe123 user. Similarly, relative to Group Names, entering GROUP ONE, group one, or Group OnE will delete: Group One. Entering Group 1 will not remove the Group One group name.
-
Accept the default Yes position of the Remove User Folders switch to delete the associated user folders (c:\users). Slide this switch to the left or No position if you do not want to delete these folders.
-
To schedule the job run frequency, click Add Trigger. Here, you can establish run dates and times, managing the job schedule using Verify Privilege Manager. Alternatively, you can disregard Add Trigger, running scheduled jobs on an ad hoc basis from the agent workstation.
-
To store your updates, click Save Changes. The Inactive switch appears near the top right of the page. You can slide this switch to the right, activating the scheduled job.