Verify Privilege Manager High Availability Setup
This topic explains the steps involved to set up IBM Security Verify Privilege Manager High Availability, also known as clustering.
Prerequisites
Make sure that Verify Privilege Manageris installed and working on a primary node with an existing database.
To cluster Verify Privilege Managera secondary server must be prepared with the proper Verify Privilege Managerprerequisites. The prerequisites check can be performed via standard Verify Privilege Manager setup.exe. However, exit that automated installer once all prerequisites clear.
Except for the Operating System, the following prerequisites will be installed automatically by our installer. If you already have some of them installed or wish to install them yourself then the installer will skip over them.
System Requirements Overview
- Windows Server 2016 or newer
- Microsoft SQL Server 2016 or newer
- Microsoft Internet Information Services (IIS) 10 or newer
- Microsoft .NET Framework 4.6.1 or newer
Using the Installer to Install/Confirm Prerequisites
The latest version of Verify Privilege Manager is available for download. By clicking the Installer (.exe) link, a setup.exe file will be downloaded to your machine. It is recommended to run the setup.exe file as an administrator.
The setup executable will ONLY be used to install/confirm all prerequisites are installed on the web server. After confirming the prerequisites, the installer will be closed and a manual installation will be completed. The manual installation will allow for separate databases and custom file locations. Do NOT complete the installation with the setup executable.
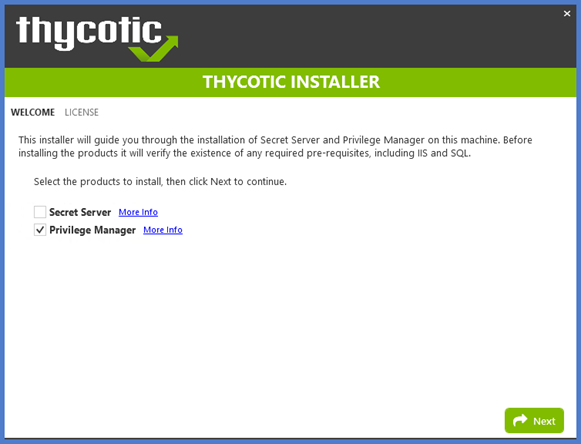
Running the setup.exe will begin an installation wizard. This wizard will ONLY be used to install any remaining prerequisites required on the web server. The wizard will walk through the initial installation steps, beginning with a Welcome page.
-
On the Welcome dialog, verify that Verify Privilege Manager is selected and select the checkbox if not already checked.
-
Click Next.
-
On the License dialog review the End User License Agreement (EULA) and click Accept License.
-
On the Database dialog select Connect to an existing SQL Server, click Next.
-
The Prerequisites dialog helps you to ensure everything that is required gets installed for Verify Privilege Manager. Click Fix Issues to automatically install the necessary prerequisites.
-
Close the installer once all prerequisites are successfully installed.
Do NOT continue installing the products with this installer.
Manual Set-up of Secondary Node
In this procedure you will:
- Copy the web application files from the primary server to the secondary server.
- Use those copied files to setup and configure the secondary Verify Privilege Manager server.
- Use the Internet Information Services Manager to setup Application Pools.
- Convert application pools to applications.
- Configure Authentication.
- Set the Preload Status.
- Change the Disable Overlapped Recycle setting.
- Edit the TMS/Worker Web.config file.
Copy Web Application Files from Primary to Secondary Servers
-
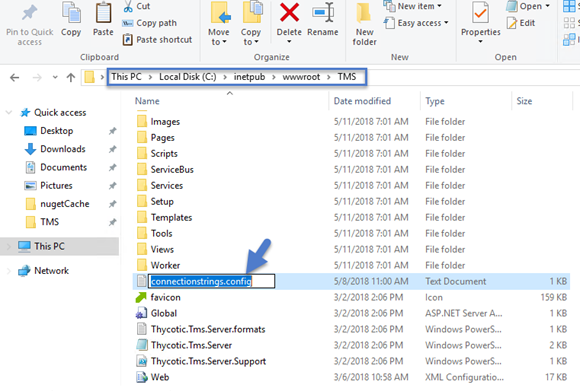
On the primary server, decrypt the connectionStrings.config by running the following command:
CopyC:\Windows\Microsoft.NET\Framework64\v4.0.30319\aspnet_regiis.exe -pd "connectionStrings" -app "/Tms" -
Select and copy all contents of the Verify Privilege Managerweb application folder at
CopyC:\inetpub\wwwroot\TMS\Including the unencrypted connectionStrings.config file.
-
On the secondary server, create the same folder path.
-
Paste the entire contents of the Verify Privilege Manager web application folder from the primary web server to the similar location on the secondary web server.
Setting up Application Pools
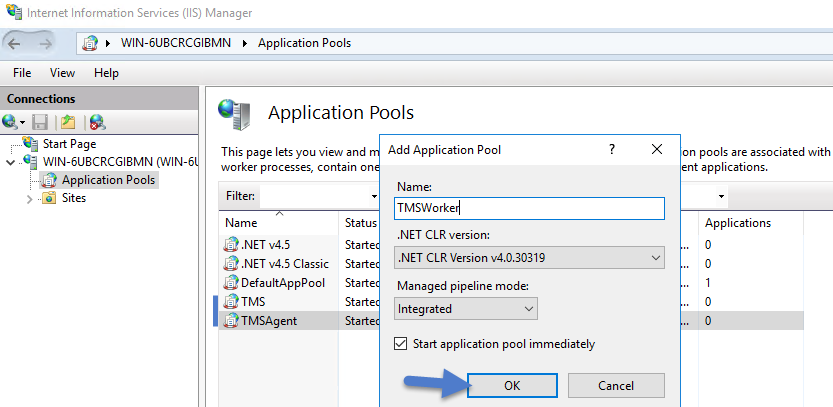
- Open Internet Information Services Manager (inetmgr).
- Under your local server, right-click Application Pools and select Add Application Pool...
-
Add three new application pools.
-
TMS - Under General > Start Mode select OnDemand (Default).
-
TMSAgent - Under General > Start Mode select AlwaysRunning.
-
TMSWorker - Under General > Start Mode select AlwaysRunning.
-
-
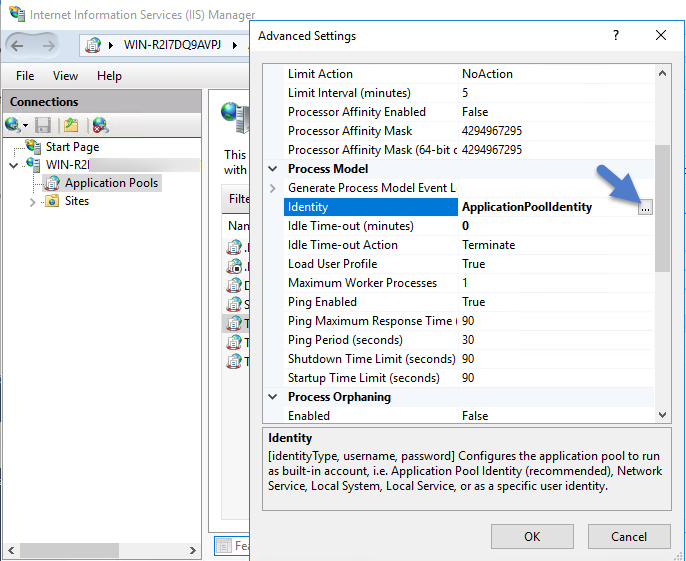
For each of the 3 app pools (TMS, TMSAgent, and TMSWorker),
-
right-click on each app pool,
-
select Advanced Settings...
-
then the Identity box in the "Process Model" section,
-
click the three dots on the right of the box.
-
Select the Custom Account radio button,
-
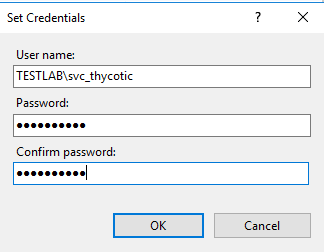
Click Set, enter your service account's name and password.
-
Click OK.
-
Converting the Application Pools
-
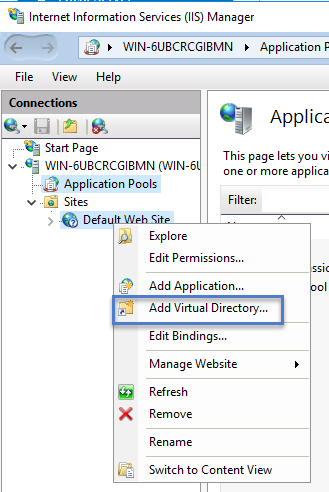
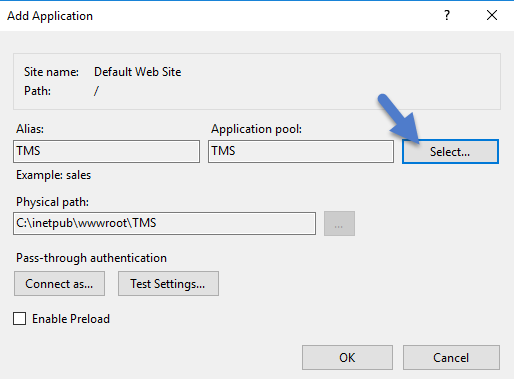
Right-click Default Web Site in IIS and select Add Virtual Directory….
-
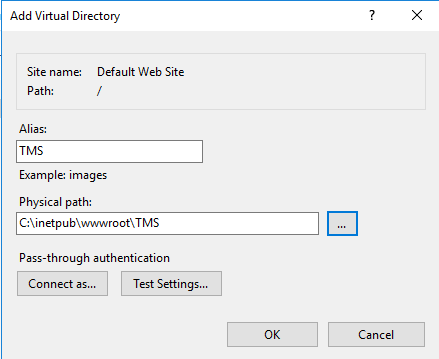
Select an alias for your Verify Privilege Manager. The alias is what will be appended to the website. For instance, "TMS" in
http://myserver/TMS. -
Next, enter the physical directory where you unzipped Verify Privilege Manager(i.e., 'C:\inetpub\wwwroot\TMS').
-
Click OK.
-
In the tree, right-click the new virtual directory and select Convert to Application.
-
Set the Application Pool to the one called TMS.
-
Click OK.
-
-
In the virtual directory expand the new TMS site,
- right click the Agent Subfolder and select Convert to Application.
- Set the Application Pool to the one called TMSAgent, click OK.
-
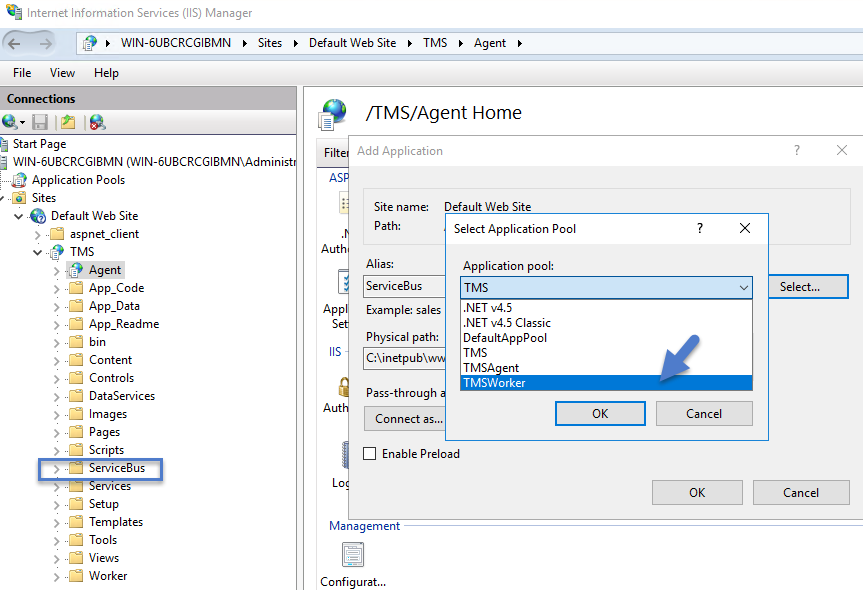
In the virtual directory navigate to the ServiceBus Subfolder.
-
Right-click and select Convert to Application.
-
Set the Application Pool to the one called TMSWorker you created earlier, click OK.
-
-
In the virtual directory select the Services Subfolder,
- Right-click the new virtual directory and select Convert to Application.
- Ensure that the Application Pool is set to the one called TMS, click OK.
-
In the virtual directory select the Setup Subfolder,
- Right-click the new virtual directory and select Convert to Application.
- Ensure that the Application Pool is set to the one called TMS, click OK.
-
In the virtual directory select the Worker Subfolder,
- Right-click the new virtual directory and select Convert to Application.
- Set the Application Pool to the one called TMSWorker, click OK.
Setting Authentication
-
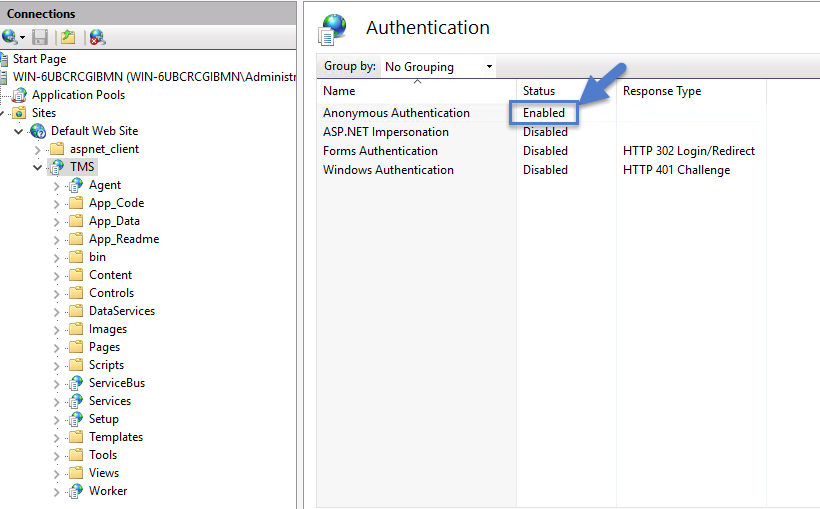
Select your TMS virtual directory.
-
Double-click Authentication in the features pane.
-
Make sure that only Anonymous Authentication is set to Enabled. Everything else should be set to disabled.
-
-
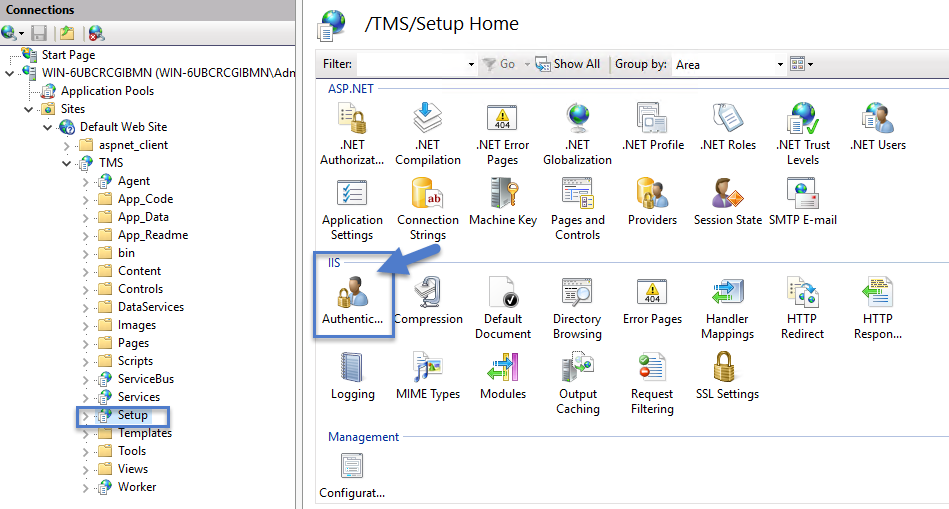
Select the Setup directory.
-
Double click Authentication in the features pane.
-
Make sure that Anonymous Authentication and Windows Authentication are both set to Enabled and everything else is disabled.
-
-
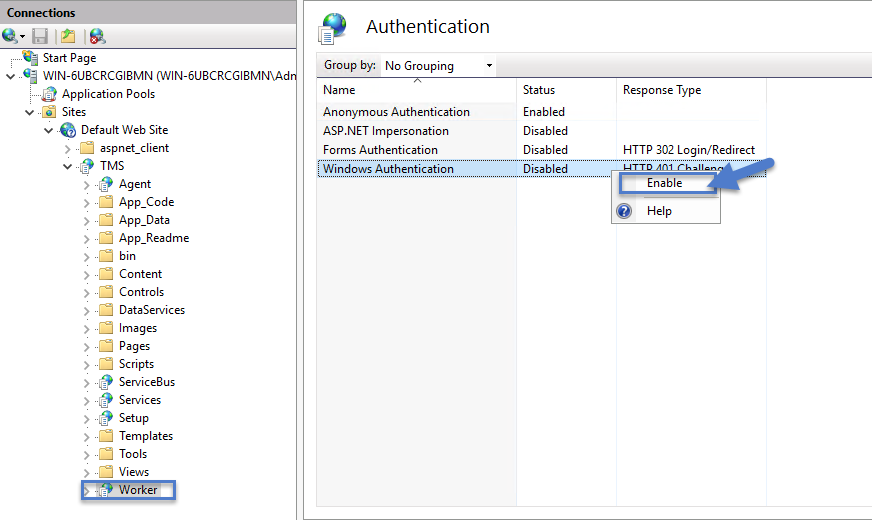
Select the Worker.
-
Double-click Authentication in the features pane and make sure that Anonymous Authentication and Windows Authentication are both set to Enabled and everything else is disabled.
-
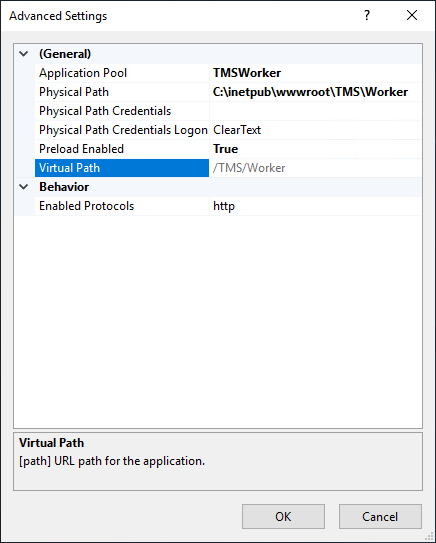
Setting the Preload Status
-
Right-click the TMSWorker application.
-
Select Advanced settings.
-
Under General > Preload Enabled, change the setting to True.
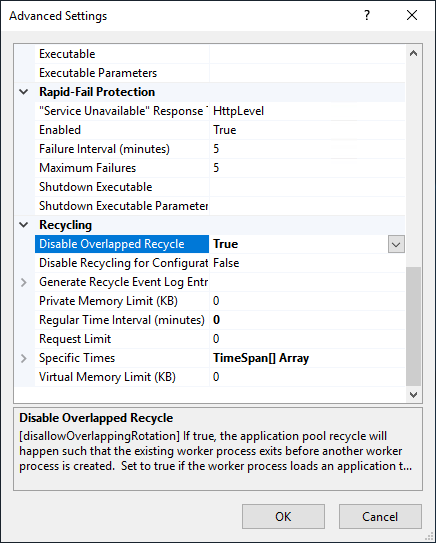
HA Deployment
Perform the following IIS changes as part of the best practices setup.
-
In IIS, right-click the TMSWorker application pool.
-
Select Advanced Settings.
-
Under the Recycling section, change Disable Overlapped Recycle to True.
-
Navigate to
C:\inetpub\wwwroot\TMS\Worker\Web.config. -
Locate the system.webServer section and add:
Copy<applicationInitialization doAppInitAfterRestart="true">
<add initializationPage="/status/ping" /> </applicationInitialization>The section should now look like this:
Copy<system.webServer>
<applicationInitialization doAppInitAfterRestart="true"> <add initializationPage="/status/ping" /> </applicationInitialization> <modules runAllManagedModulesForAllRequests="true"> <remove name="UrlRoutingModule"/> <add name="UrlRoutingModule" type="System.Web.Routing.UrlRoutingModule, System.Web, Version=4.0.0.0, Culture=neutral, PublicKeyToken=b03f5f7f11d50a3a"/> </modules> <handlers> <add name="UrlRoutingHandler" preCondition="integratedMode" verb="*" path="UrlRouting.axd" type="System.Web.HttpForbiddenHandler, System.Web, Version=2.0.0.0, Culture=neutral, PublicKeyToken=b03f5f7f11d50a3a"/> </handlers> <security> <authorization> <add accessType="Allow" users="?"/> </authorization> </security> </system.webServer>
Folder Permissions to C:\Windows\Temp
-
Navigate to the C:\Windows\TEMP folder.
-
Right-click the folder and select Properties | Security | Advanced.
-
Click Add and Select a principal.
-
Ensure the domain machine is listed as the Location and type the service account into the Enter the object name to select field.
-
Click Check Names and Enter network credentials for accessing your domain machine.
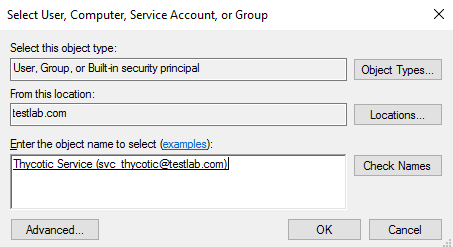
-
Click OK.
-
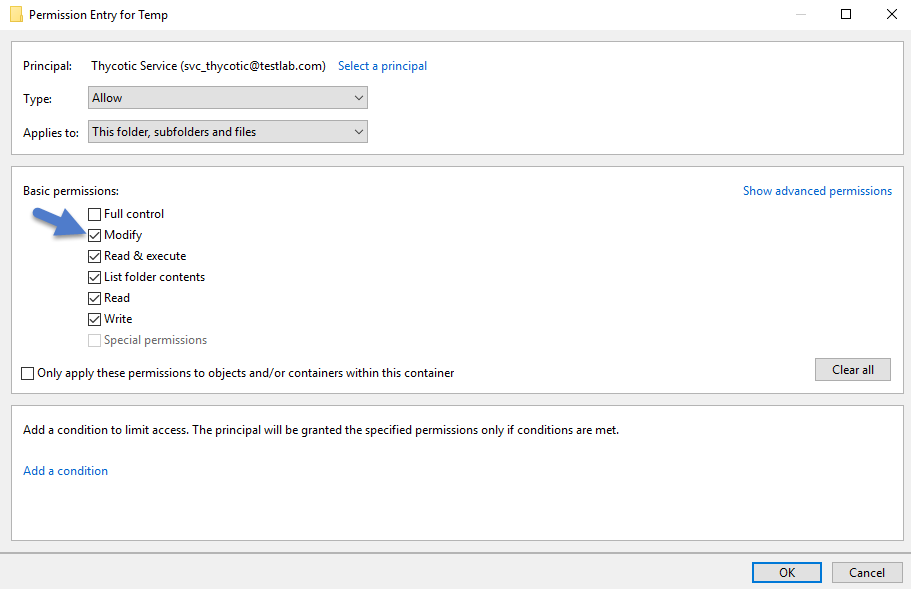
Under Basic permissions, select the Modify checkbox.
-
Verify your service account has Modify, Read & execute, List folder contents, Read, and Write permissions for the C:\Windows\TEMP folder.
-
Click OK, then Apply.
Folder Permissions to the Verify Privilege ManagerApplication Folder
-
Navigate to the Verify Privilege Managerapplication folder at C:\inetpub\wwwroot\TMS.
-
Right-click the folder and select Properties | Security | Advanced.
-
Select principal.
-
Ensure the domain machine is listed as the Location and type the service account into the Enter the object name to select field.
-
Click Check Names and Enter network credentials for accessing your domain machine.
-
Click OK.
-
Under Basic permissions, select the Modify checkbox.
-
Verify your service account has Modify, Read & execute, List folder contents, Read, and Write permissions for the C:\Windows\TEMP folder.
-
Click OK, then Apply.
The application folder only needs Write and Modify permissions during the installation or during an upgrade. You can remove these once the installation process is complete.
Upgrade Prep
Following these changes, ensure that
- all server nodes are up and running without error conditions.
- all server nodes have access to the NuGet repository.
- for upgrades login into one of the server nodes directly and not the clustered shared address.
- Initiate the upgrade, the selected node will deploy all upgrade components to all other nodes within the cluster.
Permission to Certificate Private Key (prior to 10.6 only)
This is only required for Verify Privilege Managerprior to release 10.6.
TMS requires Read access to the private key of the certificate being used for the HTTPS binding. To set this:
- Open mmc.exe as an administrator.
- Add the certificate manager snap-in choosing to manage certificates for the computer account (File | Add/Remove Snap-in…)
- Click Certificates,
- then Add | Computer account | Next | Local computer | Finish | OK.
- Find the certificate that the HTTPS binding for your site is using.
- Right-click on the certificate and select All Tasks | Manage Private Keys.
- Grant Read access to the identity account for your application pools.
If the "Manage Private Keys" option is not available, you can set this permission in PowerShell.
Verify Login on Secondary Node
- Navigate to Verify Privilege Manager, ex: http://localhost/TMS. You should be able to authenticate to Verify Privilege Manager.
- After logging in, all policies and all data accessible on the primary node should be accessible on the secondary node.
Re-encrypt ConnectionStrings.config
-
On the primary node, run the following command to re-encrypt the connectionStrings.config file:
CopyC:\Windows\Microsoft.NET\Framework64\v4.0.30319\aspnet_regiis.exe -pe "connectionStrings" -app "/Tms" -
On the secondary node, run the same command to re-encrypt the connectionStrings.config file:
CopyC:\Windows\Microsoft.NET\Framework64\v4.0.30319\aspnet_regiis.exe -pe "connectionStrings" -app "/Tms"
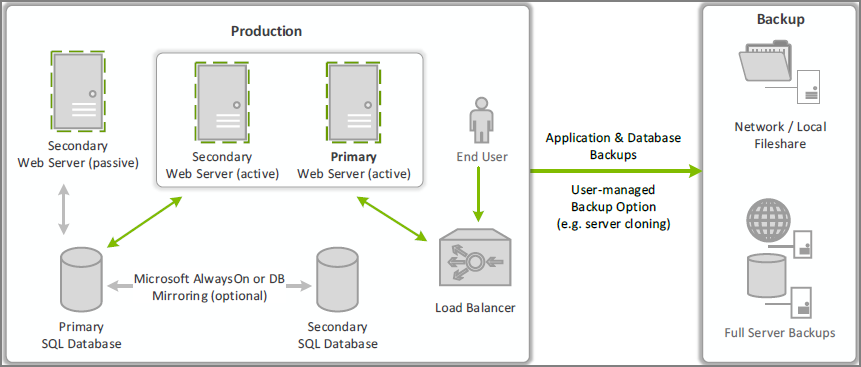
Verify Privilege Managerhas now successfully been clustered. A load balancer, GTM, VIP, etc. can be used to manage the traffic. The settings to configure this will be handled on the side of this infrastructure piece and is beyond the scope of this document. Contact IBM Security's Professional Services team if additional consultation is required.
IBM Security requires that sticky sessions are enabled on the load balancer to prevent a user from bouncing between servers on each request of a single session.