Basic Installation
Prerequisites
ASP.NET Website
Verify Privilege Manager is installed as an ASP.NET website. The setup.exe file will set up the website with the correct permissions and create the settings in IIS.
SQL Server Database
IBM Security products require an instance of SQL Server for the database backend and an instance of SQL Server Express will be installed by the setup.exe file, if missing. However, it is strongly recommended to not use SQL Server Express for production environments. SQL Server Express edition is intended for Sandbox and trial environments, IBM Security recommends purchasing SQL licensing for use in production environments.
A SQL account is required. If that account has the db_creator role, the installer can create the database during the installation. Alternatively, if the blank database was manually created before running the installer, the SQL account will require db_owner of the database. If using Windows authentication with the database, the SQL account will be the app pool service account.
Verify Privilege Manager On-Premises server software is unable to be installed on SYSTEM databases.
Administrative Access
Throughout the installation process, you will be required to be an administrator to perform most actions. Please ensure that you are logged onto your system with a Windows account that has administrative rights before beginning your install.
Additional Recommendations
- Use an SSL certificate for Verify Privilege Manager.
- Run Microsoft Update on your server to make sure all components are up to date.
Download the Latest Version of PM Installer
The latest version of Verify Privilege Manager is available for download under the Software Downloads topic. It is recommended to run the downloaded setup.exe file as an administrator.
When installing Verify Privilege Manager against SQL 2022, ensure the SQL Server and SQL Server CEIP services have been set to a startup type of Automatic and not Automatic (Delayed Start). The startup type can be checked under services.msc on the SQL Server.
Running the Installer
-
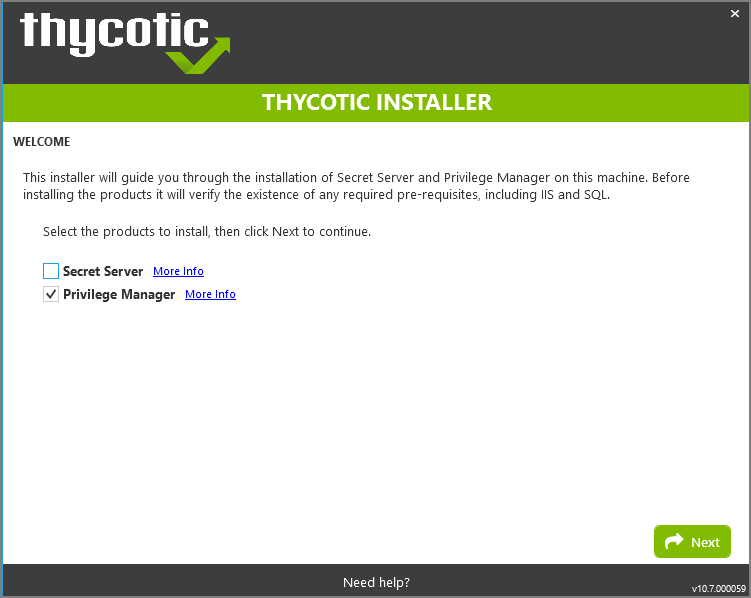
Double-click the downloaded setup.exe to run the installer. The installer opens on the WELCOME tab:
-
Verify that the Verify Privilege Manager box is checked. Click Next.
Verify Privilege Manager as a standalone product comes with three roles Administrator, Basic User, and Help Desk User roles. Please refer to Application Roles.
-
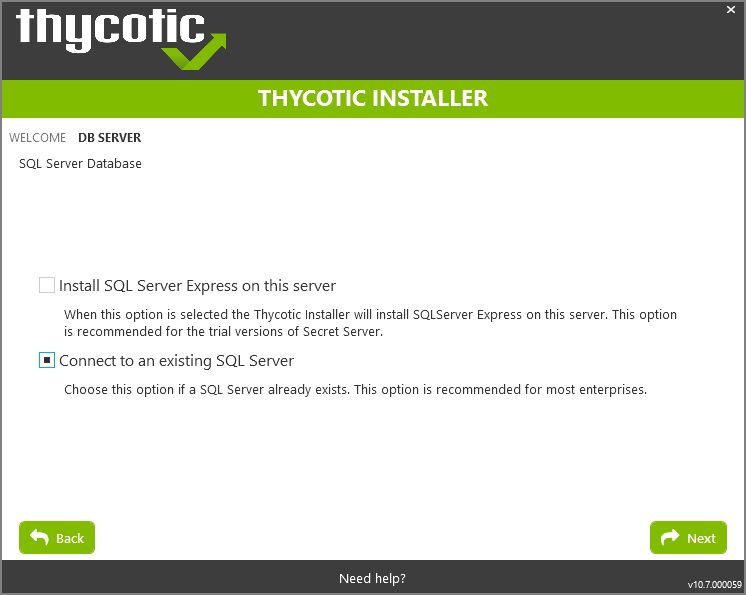
On the DB SERVER tab, choose to either install SQL Express or connect to an existing SQL Server. SQL Express requires a internet access for the installer to download the installation package for SQL Express.
Make your selection, then click Next.
For production environments IBM Security recommends installing a licensed edition of SQL before installing IBM Security products. The Express edition is only recommended for trial and sandbox environments.
- If Internet access is not available a link to download SQL Server Express will be presented to the user. At that point, they are expected to install SQL Server Express and then restart the installer.
- If Internet Access is available SQL Server Express will be installed.
- After SQL is installed select Connect to an existing SQL Server.
-
The PREREQUISITES tab ensures that everything required to install Verify Privilege Manager is setup correctly. Everything on this tab can be installed outside of the installer, but if not, the installer will install and configure them for the user. Think of this page as the non-IBM Security configuration. If there are issues, it is very likely that the Internet will be able to help as these are not installation features that are specific to IBM Security. Click Fix Issues to automatically install the necessary prerequisites.
Successful installation of a component is indicated by a green check mark. When successful, click Next.
-
If you chose Connect to an existing SQL Server on the DB SERVER page, the DB CONNECTION page is displayed and you are prompted for the connection information that Verify Privilege Manager will use. The Test Connection button must be run successfully before installation can continue. Once connection is established, click Next.
If you are not using a default InstanceName on the SQL Server for the Verify Privilege Manager database, provide the SQLServerName\InstanceName for ServerName or IP.
If you choose SQL Server Authentication, the ACCOUNT tab prompts for the server location where your SQL database is currently installed. Provide the Server Name or IP address for your Database server and Authenticate with Administrator SQL credentials. If your Verify Privilege Vault database does not yet exist when you click Test Connection, the Installer will create it. When the connection has been tested successfully, click Next.
-
The EMAIL tab opens, here the connection information for the email server can be entered. This is also optional and can be skipped to be configured later in the application by clicking Skip Email. This page will configure email for Verify Privilege Manager. Click Next.
-
On the REVIEW tab, most settings are defaulted for a user. Click Modify for any setting, if necessary. Certain validations will occur on these settings before the install can begin. Click Install to proceed.
-
The Install page will show the status from log files as Verify Privilege Vault and/or Verify Privilege Manager are installed. Installs vary depending on your environment, most installs last between 15-45 minutes.
-
On the FINISH tab, when the install has successfully completed, click the provided Verify Privilege Manager URL to navigate directly to your setup landing page or open a browser and navigate to where your Verify Privilege Manager is located, for example: http://localhost/TMS/PrivilegeManager.
IBM Securityrecommends creating a back-up copy of the Verify Privilege Manager web application folder after installation or upgrades.

-
The LOG FILES tab is available after the applications are installed. The installer provides the link to open a web browser to the product login page. At this point, everything is installed and ready for you to begin using your new IBM Security product. If the installation failed or you wish you view the logs from the installation you can click View Log Files
.
Installing Connectors or the API
Verify Privilege Manager installs the core packages. Once your instance is up and running, use Setup to add connectors for foreign systems or the Privilege Manager Application Programming Interface.
Refer to Upgrades for details about how to access Setup and use the Add / Upgrade Verify Privilege Manager Features option.
Clustering Verify Privilege Manager
To install Verify Privilege Manager in a cluster, follow the steps above to install the application on the primary server. Then follow the Migration Steps to copy the web files to the secondary server and configure the secondary site. Then follow the steps for any additional servers in the cluster.