10.5 Folder Permissions - MachineKeys
During installation of Verify Privilege Manager 10.5 (or an upgrade from prior versions) Verify Privilege Manager attempts to create a new self-signed certificate for internal use. If permissions on the folder %ProgramData%\Microsoft\Crypto\RSA\MachineKeys are incorrect, the install fails with a cryptographic exception and the text Access Denied.
Follow the steps below to add Everyone (Read, Write, This Folder Only) permissions to %ProgramData%\Microsoft\Crypto\RSA\MachineKeys.
-
Browse to
%ProgramData%\Microsoft\Crypto\RSA\MachineKeys. -
Right-click on the folder and select Properties.
-
Select the Security tab and click the Advanced button.
-
On the Permissions tab, click Change permissions. (If you are already running as an administrator, you may not need this step.)
-
On the Permissions Tab, click Add.
-
On the next dialog, click the Select a principal link.
-
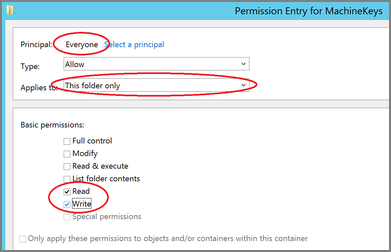
In the Enter the object name to select field, type Everyone and click OK.
-
You will see the dialog shown below, select This folder only and Read and Write.
-
Click OK to add the entry.
-
Click Apply to apply the changes.
-
Navigate back to the Verify Privilege Manager Setup page and select the repair option for the Verify Privilege Manager Server Core Solution.