Creating a New Installation
Before you can begin auditing, you must create at least one audit installation and a management database. Creating the management database, however, requires SQL Server system administrator privileges on the computer that hosts the SQL Server instance. If possible, you should have a database administrator add your Active Directory domain account to the SQL Server system administrators role.
If you have not been added to the system administrators role, you should contact a database administrator to assist you. For more information about creating a new installation when you don’t have system administrator privileges, see How to create an installation without system administrator privileges.
To Create a New Installation and Management Database as a System Administrator
-
Log on using an Active Directory account with permission to install software on the local computer and permissions listed in Creating a setup user account for installation.
-
Open Audit Manager.
Note:If you haven’t configured an audit installation yet, the New Installation wizard opens automatically.
-
If this isn’t your first audit installation: in Audit Manager, right-click IBM Audit Manager and select New Installation to open the New Installation wizard.
-
Enter a name for the new installation, then click Next.
Tip: Name the installation to reflect its administrative scope. For example, if you are using one installation for your entire organization, you might include the organization name and All or Global in the installation name, such as AcmeAll. If you plan to use separate installations for different regions or divisions, you might include that information in the name, for example AcmeBrazil for a regional installation or AcmeFinance for an installation that audits computers in the Finance department.
-
Select the option to create a new management database and verify the SQL Server computer name, instance name, and database name are correct.
If the server does not use the default TCP port (1433), you must provide the server and instance names separated by a backslash, then type a comma and the appropriate port number. For example, if the server name is ACME, the instance name is BOSTON, and the port number is 1234, the server name would be ACME\BOSTON,1234.
If you're installing on a SQL cluster, enter the SQL cluster name in the SQL Server computer name field.
If you’re connecting to a SQL Server availability group listener, click Options (next to the Server Name) and enter the following connection string parameters:
MultiSubnetFailover=Yes
Click Next to continue.
-
Select a specific SQL login account with sufficient privileges or default NT AUTHORITY\SYSTEM account, then click Next.
A SQL login account executes the stored procedures that read and write information to the management database. You must configure the account as a member of the system administrator fixed server role on the selected database server.
Choosing the default NT AUTHORITY\SYSTEM account or an Active Directory account can cause latch contention that may slow audit data despooling. It is not recommend to use the NT AUTHORITY\SYSTEM account in production environments. -
Type the license key you received, then click Add or click Import to import the keys directly from a file, then click Next.
-
Accept the default location or click Browse to select a different Active Directory location for publishing installation information, then click Next.
You must have the Active Directory permission to Create serviceConnectionPoint objects on the container or organizational unit you select for publishing installation information.
-
Select the installation-wide auditing options you want to enable, then click Next.
- Select Enable video capture recording of user activity if you want to capture shell or desktop activity on computers when users are audited, then click Next.
Selecting this option enables you to review everything displayed during an audited user session, but will increase the audit store database storage requirements for the installation. You can deselect this option if you are only interested in a summary of user activity in the form of audit trail events. Audit trail events are recorded when users log on, open applications, and select and use role assignments with elevated rights.
- Select Do not allow any users to review their own sessions to prevent all users from updating the review status for their own sessions or adding comments to their own sessions.
- Select Do not allow any users to delete their own sessions to prevent all users from deleting their own sessions.
If you set either of the installation wide policies disallowing user activity, the policy takes precedence over any rights provided by a user’s audit role.
-
Review details about the installation and management database, then click Next.
If you have SQL Server system administrator (sa) privileges and can connect to the SQL Server instance, the wizard automatically creates the management database.
- Select the Launch Add Audit Store Wizard option if you want to start the Add Audit Store wizard, then click Finish.
If you want to create the first audit store database on a different SQL Server instance, you should deselect the Launch Add Audit Store Wizard option and click Finish.
For more information about adding the first audit store database, see Creating the first audit store.
How to Create an Installation without System Administrator Privileges
If you do not have the appropriate permission to create SQL Server databases, you cannot use the New Installation wizard to create the management database without the assistance of a database administrator.
If you do not have system administrator privileges, the wizard prompts you to specify another set of credentials or generate SQL scripts to give to a database administrator. For example:
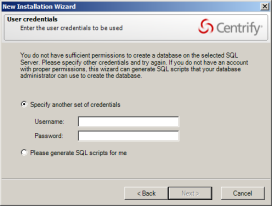
If you don’t have a database administrator immediately available who can enter the credentials for you, you cannot continue with the installation.
To Create an Installation when you don’t have System Administrator Privileges
-
Select the option to generate the SQL scripts, then click Next.
-
Select the folder location for the scripts, then click Next.
-
Review details about the installation and management database you want created, then click Next.
The wizard generates two scripts: Script1 prepares the SQL Server instance for the management database and Script2 creates the database.
-
Click Finish to exit the New Installation wizard.
-
Send the scripts to a database administrator with a service or change-control request.
You should notify the database administrator that the scripts must be run in the proper sequence and not modified in any way. Changes to the scripts could render the database unusable.
-
After the database administrator creates the database using the scripts, open the Audit Manager console to run the New Installation wizard again.
-
Type the name of the installation, then click Next.
-
Select Use an existing database and verify the database server and instance name, then click the Database name list to browse for the database name that the database administrator created for you.
If the server does not use the default TCP port, specify the port number as part of the server name. For example, if the port number is 1234, the server name would be similar to ACME\BOSTON,1234.
If you're installing on a SQL cluster, enter the SQL cluster name in the SQL Server computer name field.
-
Select the database name from the list of available databases, click OK, then click Next.
You should only select an existing database if the database was created using scripts provided by IBM.
-
Select a specific SQL login account with sufficient privileges or default NT AUTHORITY\SYSTEM account, then click Next.
A SQL login account executes the stored procedures that read and write information to the management database. You must configure the account as a member of the system administrator fixed server role on the selected database server.
Choosing the default NT AUTHORITY\SYSTEM account or an Active Directory account can cause latch contention that may slow audit data despooling. It is not recommend to use the NT AUTHORITY\SYSTEM account in production environments.
- Type a license key or import licenses from a file, then click Next.
- Review details about the management database to be installed, then click Next.
- Select the Launch Add Audit Store Wizard option if you want to start the Add Audit Store wizard, then click Finish.
Creating the First Audit Store
If you selected the Launch Add Audit Store Wizard check box at the end of the New Installation Wizard, the Add Audit Store Wizard opens automatically. You can also open the wizard at any time by right-clicking the Audit Stores node in the Audit Manager console and choosing Add Audit Store.
To create the first audit store:
-
Type a display name for the audit store, then click Next.
If your plan specifies multiple audit stores, use the name to reflect the sites or subnets serviced by this audit store. Note that an audit store is actually a record in the management database. It is not a separate process running on any computer. You use a separate wizard to create the databases for an audit store. -
Select the type of systems that the audit store will serve.
You can choose to separate Windows traffic from UNIX traffic if both types of agents belong to the same site or subnet.
The options are:
- Windows and UNIX
- Windows
- UNIX
Click Next to continue.
-
Click Add Site or Add Subnet to specify the sites or subnets in this audit store.
- If you select Add Site, you are prompted to select an Active Directory site.
- If you select Add Subnet, you are prompted to type the network address and subnet mask.
The Windows components for DirectAudit now support IPv6. The Add Subnet dialog for subnet-based scopes requires both IPv4 and IPv6 subnets in CIDR format (e.g., 192.168.16.0/24 or fe80:1234::/64). This approach simplifies the UI and accommodates IPv6, which lacks old-style subnet masks. A tooltip displays the required format when hovering over the input field.
After you make a selection or type the address, click OK. You can then add more sites or subnets to the audit store. When you are finished adding sites or subnets, click Next to continue.
The computer you use to host the audit store database should be no more than one gateway or router away from the computers being audited. If your Active Directory sites are too broad, you can use standard network subnets to limit the scope of the audit store.
-
Review information about the audit store display name and sites or subnets, then click Next.
-
Select the Launch Add Audit Store Database Wizard option if you want to create the first audit store database, then click Finish.
Creating the First Audit Store Database
If you selected the Launch Add Audit Store Database Wizard check box at the end of the Launch Add Audit Store Wizard, the Add Audit Store Database Wizard opens automatically. You can also open the wizard at any time from the Audit Manager console by expanding an audit store, right-clicking the Databases node, and choosing Add Audit Store Database.
To create the first audit store database:
-
Type a display name for the audit store database, then click Next.
The default name is based on the name of the audit store and the date the database is created.
-
Select the option to create a new database and verify that the SQL Server computer name, instance name, and database name are correct.
The default database name is the same as the display name. You can change the database name to be different from the display name, if you want to use another name.
If the server does not use the default TCP port, specify the port number as part of the server name. For example, if the port number is 1234, the server name would be similar to ACME\BOSTON,1234.
If you're installing on a SQL cluster, enter the SQL cluster name in the SQL Server computer name field.
When entering the SQL Server host computer name, note that you can enter either the server short name (which is automatically resolved to its fully qualified domain name, or FQDN) or the actual server FQDN or the CNAME alias for the server.
If the database is an Amazon RDS SQL Server:
- Select the This is an Amazon RDS SQL Server option.
- In the Server Name field, enter the RDS SQL Server database instance endpoint name used for Kerberos authentication.
For example, if the database host name is northwest1 and the domain name is sales.acme.com, then the endpoint name would be northwest1.sales.acme.com.
Click Options to enter additional connection string parameters or to enable data integrity checking.
- If you’re connecting to a SQL Server availability group listener, click Options (next to the Server Name) and enter the following connection string parameters:
MultiSubnetFailover=Yes
- You can enable or disable data integrity checking once, when you create the audit store database. To change the state, you must rotate to a new audit store database.
When you create your audit store database, you have the option to enable data integrity checking. Data integrity checking provides the ability to detect if auditing data has been tampered. For example, data integrity checking can detect if a user who has write privileges over the Audit Store database directly manipulates the audited session data by making a direct connection to the Microsoft SQL Server database. Data integrity checking cannot detect tampering if a database administrator deletes an entire session or database.
Click Next to continue.
-
Because this is the first audit store database, you also want to make it the active database. This option is selected by default. If you are creating the database for future use and don’t want to use it immediately, you can deselect the Set as active database option. The option to create a new database is also selected by default.
Click Next to continue.
-
Specify the stored procedures services account: Select a specific SQL login account with sufficient privileges or default NT AUTHORITY\SYSTEM account.
A SQL login account executes the stored procedures that read and write information to the management database. You must configure the account as a member of the system administrator fixed server role on the selected database server.
Choosing the default NT AUTHORITY\SYSTEM account or an Active Directory account can cause latch contention that may slow audit data despooling. It is not recommend to use the NT AUTHORITY\SYSTEM account in production environments.
When you use an Amazon RDS for SQL Server database, Amazon RDS automatically adds the account you specify to the db_owner fixed database role.Click Next to continue.
-
Review details about the audit store database, then click Next.
If you have the correct privileges and can connect to the SQL Server instance, the wizard automatically creates the audit store database.