Installing the Audit Module for PowerShell
You can install the Audit Module for PowerShell from the Verify Privilege Server Suite setup program or as a separate package. It includes the auditing-related cmdlets for Windows PowerShell, sample scripts, and documentation for performing common administrative tasks using PowerShell scripts. This chapter describes how to install the software on a Windows computer.
The following topics are covered:
- About the standalone package
- Running the setup program
- Importing the cmdlets into the Windows PowerShell console
About the Standalone Package
The cmdlets that run in Windows PowerShell are defined in dynamic link libraries that can be installed on any computer where you install other Windows-based components, such as Audit Manager or Audit Analyzer. You can also install these libraries separately, along with sample scripts and documentation, onto computers where no Verify Privilege Server Suite software is installed.
If you did not install the Audit Module for PowerShell as a component of a Verify Privilege Server Suite installation, you can install it separately. The Audit Module for PowerShell files are available in the same disk image from which you installed Verify Privilege Server Suite.
Running the Setup Program
You run the setup program to install the Audit Module for PowerShell files.
To run the standalone setup program
-
Select the downloaded file, right-click, then select Extract All to extract the compressed files to a folder.
-
In the Windows disk image for Verify Privilege Server Suite, navigate to the /DirectAudit/Powershell folder and double-click the standalone executable to start the setup program.
For example, double click the IBM Security DirectAudit PowerShell64.exe file.
-
At the Welcome page, click Next.
-
Select I accept the terms in the License Agreement, then click Next.
-
Accept the default location or click Change to choose a different location, then click OK.
If you accept the default location, the cmdlets are available in a separate Audit Module for PowerShell console.
If you want the cmdlets to be available in the default Windows PowerShell console with other PowerShell modules, select the following location:
C:\Windows\System32\WindowsPowerShell\v1.0\Modules\Centrify.DirectAudit.PowerShell -
Verify the path to the Centrify.DirectAudit.PowerShell folder, then click Next.
-
Click Install.
-
Click Finish to complete the installation.
Importing the cmdlets into the Windows PowerShell Console
If you install the Audit Module for PowerShell in the default location, it is a self-contained Windows PowerShell console. If you install the files in the location for system modules so that cmdlets from other modules are available in the same console, you should import the Audit Module for PowerShell into your default Windows PowerShell console.
According to Microsoft, the Import System Modules task is available only Windows 7 and Windows Server 2008 R2 when Windows PowerShell 3.0 is not installed on the computer. Beginning in Windows PowerShell 3.0, modules are imported automatically the first time that you use a cmdlet in the module.
To import the auditing module
-
On the Start menu, select Windows PowerShell to display a menu extension with a list of Tasks.
-
On the Tasks menu, select Import System Modules to import the auditing module and open the Windows PowerShell console.
-
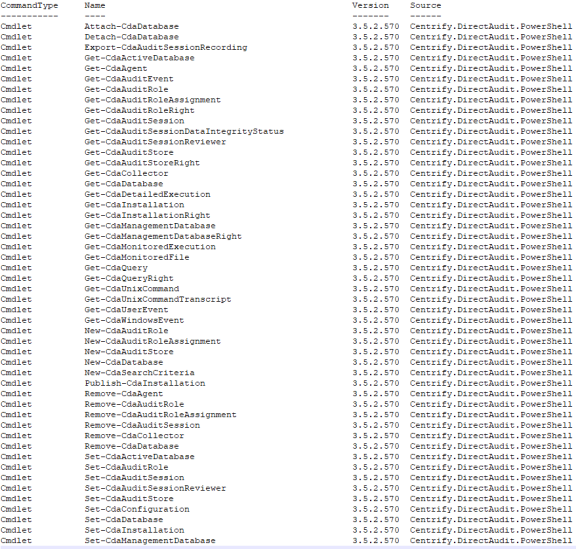
Verify the installation and import completed successfully by typing the following command:
get-command *-Cda*
You should see a listing of the audit cmdlets, similar to the following: