Creating a Discovery Source
Introduction
A discovery source is a named collective, ordered system that conducts discovery. There are six broad types to choose from:
-
Active Directory
-
Linux/Unix
-
VMware ESX\ESXi
-
AWS (Amazon Web Services)
-
GCP (Google Cloud Platform)
-
Entra ID
Configuring discovery is defining the parameters of the discovery source. Each discovery source is a configurable definition of how to scan for computer assets in a given environment. A subcomponent of a discovery source, called a scanner, details how to perform those scans.
Procedure
-
Search for Discovery Sources on the main page and select it.
-
Select the Create dropdown list and select the type of source you need:
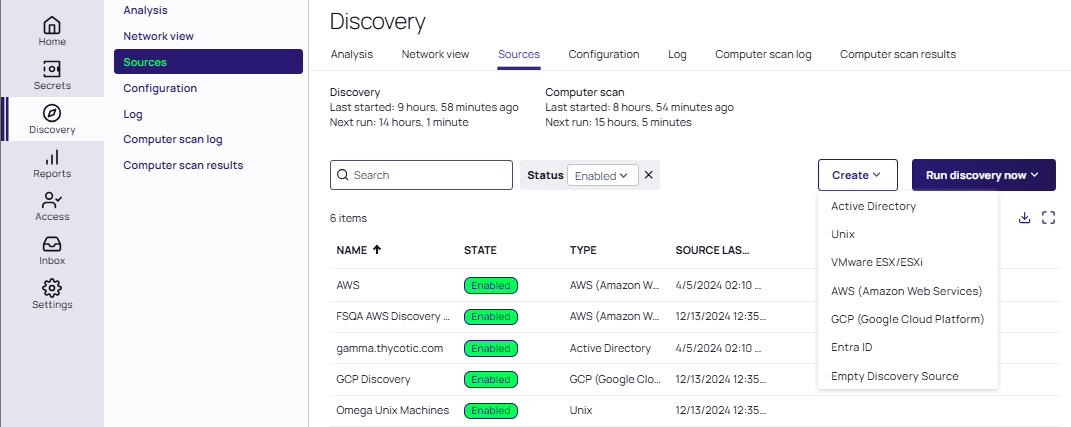
For all sources except for Active Directory you are prompted for a name, site, source type, and secret. Active directory has a specific dialog which allows for some advanced validation and customization.
Active Directory discovery scans Active Directory (AD) machines, AD user accounts, local Windows accounts, and their dependencies within an AD domain. The discovery process begins by identifying machines within your domain, followed by scanning each machine for local Windows accounts and associated dependencies. By default, the scan includes local accounts, domain accounts, scheduled tasks, Windows services, and IIS application pools. To further enhance the discovery process, you have the option to create PowerShell scanners, which allow for the identification of additional accounts and dependencies. PowerShell scanners are an advanced topic covered in detail within the Extensible Discovery section.-
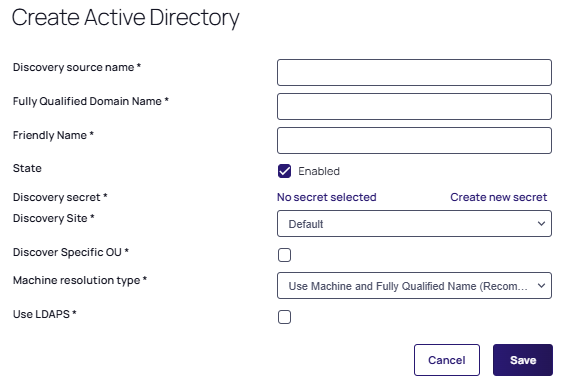
If the Active Directory option is chosen:
-
The Create Active Directory discovery source page appears:
 If you upgraded from an earlier version of Verify Privilege Vault and have created an AD domain within it, a corresponding discovery source is displayed on this page. If discovery was not enabled on that domain, the discovery source Active column is not checked for that discovery source.
 -
Type in values for the following mandatory fields:
-
Discovery source name
-
Fully Qualified Domain Name
-
Friendly Name
-
Discovery secret
-
Discovery Site
-
Discover Specific OU
-
Machine resolution type
-
Use LDAPS
-
-
Ensure the State checkbox is set to Enabled.
This activates the discovery source for scanning. Enabled discovery sources are scanned at the defined discovery interval. If you have multiple discovery sources, the discovery source with the most un-scanned computers is scanned first.
-
Click the No Secret Selected link. The Select Secret popup page appears.
-
Select a secret that will be used as the credentials for discovery scanning and AD synchronization. These credentials must have the proper rights to scan the remote machines.
-
Once you've selected a secret the popup page closes. The name of the secret you chose replaces the No Secret Selected link name.
-
Alternatively, you can create a new secret for the credentials:
-
Click the Create New Secret link. The Create New Secret popup dialog appears.
-
Search for and select the Generic Discovery Credentials secret template. Another Create New Secret popup appears.
-
Type or select the parameters needed for the discovery operation. Parameters with asterisks are required.
-
Click the Create Secret button.
-
-
Click the Discovery Site dropdown list to select the desired site for the discovery source.
If distributed engines are set up, the list shows all active sites. If no distributed engines are set up, the list defaults to local, and you cannot change it.
-
Select the Discover Specific OU checkbox to limit your discovery to an OU.
See Enabling Specific OU Domain Discovery to define the scanned OU. When you select this option, a Domain Scope tab appears on the Discovery Source page for the created AD discovery source.
-
Leave the Machine Resolution Type dropdown list set to Use Machine and Fully Qualified Name unless you have a specific reason to change it.
-
Check the Use LDAPS checkbox to if you want this server to connect to the LDAP server using SSL.
-
Click the Save button.
Verify Privilege Vault attempts to access the domain with your specified credentials to ensure the configuration is correct. Verify Privilege Vault must have access to the domain provided, and the account credentials must work.
-
-
-
For other source types when selected:
For Linux/Unix, the default command sets efficiently discover machines and accounts in a wide range of Linux/Unix environments. By default, the "Find Non-Daemon Users (Basic Unix)" command set is used for discovery. If you wish, however, to include the built-in account in the discovery process, you will need to update the discovery source to use the "Find All Users (Basic Unix)" command set. For further customization, you can create new command sets by accessing the "Configure Command Sets" option on the Discovery Sources list page. Additionally, you can modify the secrets employed during the discovery by accessing the scanner settings.-
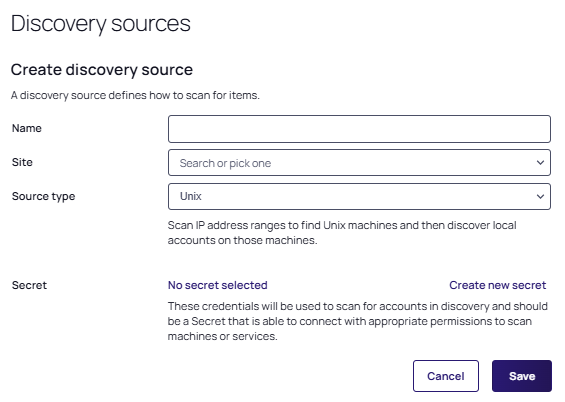
The discovery sources page appears:
-
Type the name of the discovery source in the Name field.
-
Click the Site dropdown list to select the domain.
-
Click the Source Type dropdown list and choose one of the following:
-
Empty: An empty discovery source does not have any scanners in it and after it is created you will need to add scanners before it can be activated. Creating an empty source is for when you have specific scanners in mind or want to build it from scratch.
-
Linux/Unix: Scan IP address ranges to find Linux/Unix machines and then discover local accounts on those machines.
-
AWS: Scan Amazon Web Services for keys, users, windows and non-windows machines. You will be prompted after saving to select which items.
-
GCP: Scan Google Cloud Platform for users, windows and non-windows machines. You will be prompted after saving to select items.
-
VMware ESX/ESXi: Scan IP address ranges to find VMware ESX/ESXi hosts and discover local accounts.
-
Entra ID: Scan an Entra ID tenant for Roles and Role Members.
-
-
Click the No Secret Selected link. The Select Secret popup page appears.
Select a secret that will be used as the credentials for discovery scanning and AD synchronization. These credentials must have the proper rights to scan the remote machines.
Once you have selected a secret the popup page closes. The name of the secret you chose replaces the No Secret Selected link name.
-
Alternatively, you can create a new secret for the credentials:
-
Click the Create New Secret link. The Create New Secret popup dialog appears.
-
Search for and select the Generic Discovery Credentials secret template. Another Create New Secret popup appears.
-
Type or select the parameters needed for the discovery operation. Parameters with asterisks are required.
-
Click the Create Secret button.
-
-
-
Click the Save button.
-
-
The Add Flow popup appears. Select the flow that matches the source type you just created.
-
The source details page loads automatically with the Scanners tab selected. Make any adjustments to the source scanner flow as needed.
-
All scanners for the source are listed in this tab. Click on one to see its settings in a panel that appears on the right.
-
Select Edit Scanner to make any changes to the scanner secret or its IP ranges.
Discovery Account Details
To view the Discovery Account Details:
-
Select Discovery > Network view.
-
In the Item Type dropdown list, select Directory Accounts.
-
Click the related account from the list. The account details expands to the right (for a full page view click the View details button in the expanded menu).
The account details show the Type, Full Name, Created date and time, Active Directory Account, Delta Sync Account, Discovery Source Name, Managed, Password expiration status. Click View details to proceed to the Directory Account details.
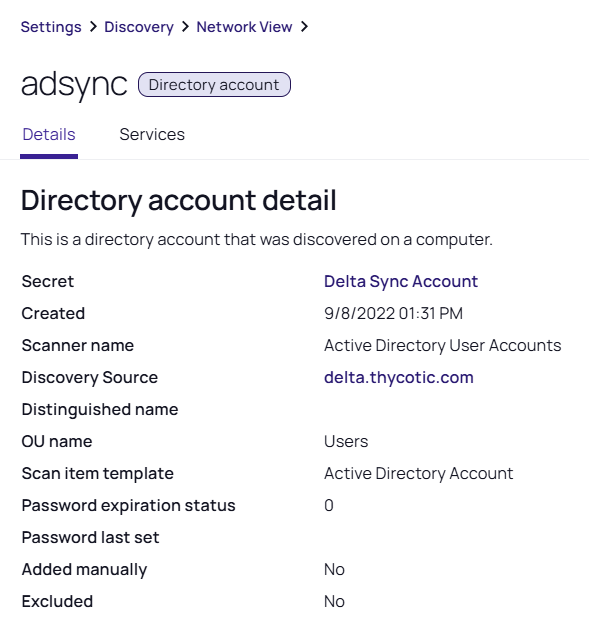
Here the following details are displayed:
-
Secret: refers to the secret associated with the directory account.
-
Created: the timestamp that indicates when the account was created. It is important for tracking the account lifecycle and understanding its history within the system.
-
Scanner name: the name of the account as identified during the discovery scan.
-
Discovery Source: the origin or the source from which the discovery process is initiated. See Discovery Source for more details.
-
Distinguished name: the unique identifier for the account within a directory service like Active Directory. It provides the full path to the account within the directory hierarchy, which is essential for locating and managing the account.
-
OU name: refers to the Organizational Unit (OU) within which the account resides. OUs are used to organize accounts and resources within a directory service, making it easier to apply policies and manage Active Directory (OU-level) permissions.
-
Scan item template: defines the criteria and properties used during the discovery scan to identify and categorize the account.
-
Password expiration status: indicates whether the account's password is set to expire and when.
-
Password last set: the timestamp that shows when the password for the account was last changed.
-
Added manually: indicates whether the account was manually added to the system, as opposed to being discovered automatically through a scan. Manually added accounts might require additional verification to ensure they are correctly configured.
-
Excluded: shows whether the account has been excluded from certain processes or scans. Exclusion might be used to prevent specific accounts from being managed or altered by automated systems, often for security or operational reasons.