Configuring Credentials for Non-Domain-Joined and Linux/Unix Scanners
Overview
This topic explains how to configure the credentials a discovery scanner uses to authenticate to non-domain-joined and Linux/Unix targets. It covers credential configuration only; it does not cover end-to-end Linux/Unix discovery setup. To create and configure a Linux/Unix discovery source from start to finish, see Creating a Linux/Unix Discovery Source.
When running Discovery on non-domain joined or Linux/Unix targets, there are two methods of finding local administrator credentials to authenticate to the target:
- Specify a secret with an expected default password - recommended for performing an initial scan if you have a known password or key for a privileged account.
- Specify a Secret Search Filter - recommended when you cannot use a default password because each machine’s account password is unique.
A Secret Search Filter dynamically searches for a secret with a name or folder location that corresponds to the target scanned. If a matching secret is found, Verify Privilege Vault will authenticate to the target using the administrator credentials in the secret.
Setting Credentials on a Discovery Scanner
-
From the left menu-bar, hover over Discovery and select Sources, the page will open by default on the Sources tab.
-
Select one of the enabled discovery sources, and inside that page, click on the Scanners tab.
-
Select a scanner from the ones available, a details page will popup on the right side of the screen where you will see the Edit Scanner option.
-
Select the Edit Scanner option and here you will see different settings for that scanner. Under Credentials, choose among the following options:
- Click Add Secret to specify a default credential.
- Click Add Secret Search Filter to specify an existing secret search filter.
Verify Privilege Vault will try the secrets and secret search filters in sequence until it finds a match.
Creating a Secret Search Filter
If you decided to create a secret search filter, perform the following:
-
In the search bar type Discovery secret search filters, this will cause the Scanner definition page to appear.
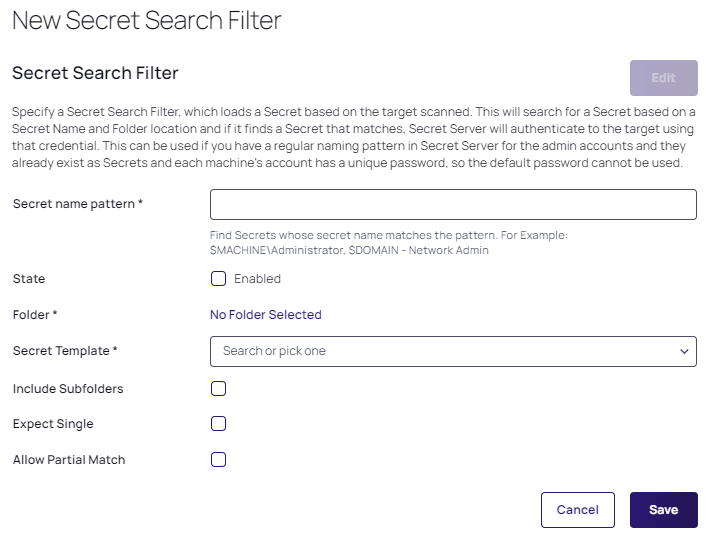
- Select Create Secret Search Filter and the following options will appear:
-
Specify all the mandatory* settings along with any others you need, as described below:
- Secret Name Pattern: Specifies the pattern that Verify Privilege Vault will search for. The search is dynamic based on the target. For example, if scanning a machine named
appserver01, Verify Privilege Vault will also search for a secret namedappserver01\system. - State: Enabled or not.
- Folder: Specifies the folder to search within.
- Secret Template: Specifies the template that returned secrets should be based on.
- Include Subfolders: Specifies that the search should include the specified folder as well as subfolders.
- Expect Single: Specifies that only one result should be returned. If more than one is returned, Verify Privilege Vault will log an error to the discovery log.
- Allow Partial Match: Specifies that secret names will be returned if they partially match the pattern. By default the secret name must be an exact match to the secret name pattern.
- Secret Name Pattern: Specifies the pattern that Verify Privilege Vault will search for. The search is dynamic based on the target. For example, if scanning a machine named
-
Click Save when all your settings have been specified and go back to your discovery source, i.e. back to the Edit Scanner page.
-
Click Add Secret Search Filter and select the filter you just created.
Now, when scanning a machine, Verify Privilege Vault will try a default credential, and then it will try the secret returned by the search filter.