Extensible Discovery
Overview
Extensible discovery lets you extend the already powerful scanning abilities of Verify Privilege Vault by creating custom scanners that run PowerShell. You can use either built-in or custom scanners and templates at each step of the extensible discovery process.
If the built-in discovery sources, scanners, or input and output templates, cannot meet your needs, you can use PowerShell scripts to perform any part of discovery. Doing so requires that you define your own input and output templates, as well as scanners, and then add them to a new or existing discovery source.
When to Use Extensible Discovery
Creating a discovery source using scripted scanners can be a lot of work to set up, so when should you consider it? If you only need to discover domain administrator accounts with standard dependencies (Windows services, application pools, and scheduled tasks), our built-in scanners will do the job, and extensible discovery is not necessary. However, your network probably contains other items you want to discover and bring under managed control. Here are some examples:
-
Discover configuration files containing passwords and automatically add them as dependencies.
-
Scan computers not joined to the domain.
-
Create dependencies that run a SQL, SSH, or PowerShell script when a secret's password changes to log events to an external source, such as an external auditing or monitoring system.
-
Record information not currently imported by local account discovery or custom fields in a secret template.
-
Discover SQL Server logins as local accounts and import them as SQL Server account secrets.
Extensible Discovery Tutorial
Discovery scanners can run custom PowerShell scripts, as well as our built-in scanners for Active Directory, UNIX, and VMware ESXi. You can use one or more built-in or custom scanners at each step of the discovery process: host range, machine, local account, and dependency discovery.
Roughly, this tutorial has four tasks:
- Understanding the process
- Setting up scripts
- Creating scan templates
- Setting up discovery scanners and sources. You define dependency templates to change items manually added to secrets and added through discovery rules.
The tutorial shows you how to take full advantage of extensible discovery by creating an Active Directory discovery source that replaces each of the built-in scanners with a PowerShell script.
For simplicity, we will only create a Windows service dependency scanner in the dependencies step, but you can add additional built-in or custom PowerShell scanners to scan for application pools, scheduled tasks, or any other item that requires an action triggered when a secret's password is changed.
Task One: Understanding the Process
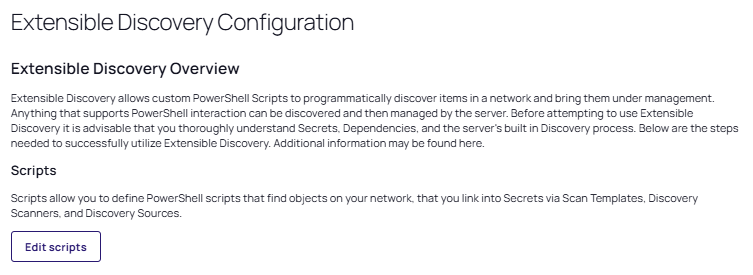
For most of this tutorial we will use the Extensible Discovery Configuration page as our launch page into each of the features that needs to be configured. Setting up extensible discovery requires making changes on several pages. The Extensible Discovery Configuration page has buttons linking to each of these pages as well as short explanations of what you need to do on them. The high-level process is as follows:
-
Create the scripts for each discovery step.
-
If necessary, create scan templates to define the information to return from the objects discovered at each step.
You want to avoid altering scan templates unless you absolutely need to. First, ensure the regular scanners cannot do the job. Once you change a template, you cannot use out-of-the-box scanners and must maintain your own PowerShell scripts for the local account and dependency scanners. -
Create discovery scanners for each step to define:
-
Which script to use for scanning.
-
Which scan template represents the objects used as the source of data for the script.
-
Which scan template represents the object returned from the script.
-
-
Create a discovery source that is configured to use discovery scanners in lieu of the default scanners.
-
Create a dependency changer for the type of dependency we want to manage.
-
Create a dependency template for the changer.
-
Manually add a dependency to a secret using the dependency changer.
-
Create a local account rule to import discovered accounts as secrets.
-
Create a dependency rule to import discovered dependencies as secrets.
Task Two: Creating the Scripts for Each Discovery Step
First, we add the scripts that we will use as our scanners to Verify Privilege Vault:
-
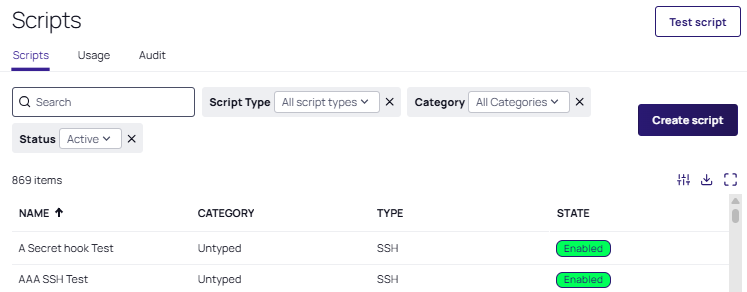
Search for Scripts: PowerShell, SQL, SSH. The Scripts tab of the Scripts page appears:
-
Select the Create script button. The New Script page appears.
-
For the Host Range Scanner, Machine Scanner, Local Account Scanner, and Windows Service Dependency Scanner scripts, fill in the following fields:
- Use the script name in the Name text box.
- Fill in the Description text box with relevant details about the script.
- Select the State checkbox to make the script Enabled.
- Pick the Script Type from the dropdown list.
- In the Category dropdown list use the Discovery Scanner category for each script.
- Copy and paste each script listed below in code snippets into the Script code text box for each of the four scripts.
- Click the OK button and repeat the process for each script.
Include the following code snippets for each script mentioned above.
Script Name: Host Range Scanner
$passwordArg = $args[2]
                $username = $args[1]

                $domain = $args[0]

                write-debug "$domain $username $passwordArg"

                $distingisheddomain = "DC=" + ($domain.Split('.') -join ",DC=");

                $Spassword = ConvertTo-SecureString "$passwordArg" -AsPlainText -Force #Secure PW

                $cred = New-Object System.Management.Automation.PSCredential ("$domain\$username", $Spassword) #Set credentials for PSCredential logon

                $ous = Get-ADOrganizationalUnit -filter 'Name -like "*"' -Server $domain -Credential $cred | select-object -property Name, ObjectGUID, @{Name = 'DistinguishedName'; Expression = {$_.DistinguishedName.Replace(",$distingisheddomain",'')}}, ObjectClass

                return $ous

                # Script Args: $[1]$Domain $[1]$username $[1]$Password
Script Name: Machine Scanner
$Ou = $args[0];

                $domain = $args[1];

                $distinguisheddomain = "DC=" + ($domain.Split('.') -join ",DC=");

                if ($distinguisheddomain.ToLower() -eq $Ou.ToLower()) {

                $searchbase = $distinguisheddomain

                } else {

                $searchbase = "$Ou,$distinguisheddomain"

                }

                $FoundComputers = @()

                $ComputersinOU = Get-ADComputer -Filter 'Name -like "*"' -Server $domain -SearchBase $searchbase -properties *

                foreach ($comp in $ComputersinOU) {

                $object = New-Object -TypeName PSObject

                $object | Add-Member -MemberType NoteProperty -Name ComputerName -Value $Comp.Name

                $object | Add-Member -MemberType NoteProperty -Name DNSHostName -Value $comp.DNSHostName

                $object | Add-Member -MemberType NoteProperty -Name ADGUID -Value $comp.ObjectGuid

                $object | Add-Member -MemberType NoteProperty -Name OperatingSystem -Value $comp.OperatingSystem

                $object | Add-Member -MemberType NoteProperty -Name DistinguishedName -Value $comp.DistinguishedName.Replace(",$distinguisheddomain",'')

                $FoundComputers += $object

                }

                return $FoundComputers

                # args: $target $[1]$domain
Script Name: Local Account Scanner
$ComputerName = $args[0]

                $username = $args[1]

                $domain = $args[2]

                $password = $args[3]

                $objComputer = New-Object System.DirectoryServices.DirectoryEntry("WinNT://$ComputerName", "$domain\$username" , $password)

                $children = $objComputer.Children | select-object SchemaClassName, Path, Name, Properties, userflags, SIDType, Disabled

                $results = @()

                foreach ($child in $children){

                Write-Debug $child

                if ($child.SchemaClassName -eq 'User'){

                write-debug "adding to results"

                $object = New-Object –TypeName PSObject;

                $object | Add-Member -MemberType NoteProperty -Name Username -Value $[child.Name](http://child.name/)[0];

                $object | Add-Member -MemberType NoteProperty -Name Resource -Value $ComputerName;

                $object | Add-Member -MemberType NoteProperty -Name Disabled -Value $child.Disabled;

                $results +=$object;

                }

                }

                return $results

                # Arguments $target $[1]$username $[1]$Domain $[1]$Password
Script Name: Windows Service Dependency Scanner
$ComputerName = $args[0]

                $accounts = Get-WMIObject Win32_Service -ComputerName $computername | Where-Object{($_.StartName -like "*\*" -or $_.StartName -like "*@*") -and $_.StartName -notlike "NT *"}

                if ($accounts) {

                $dependencyaccounts = @()

                foreach($dependency in $accounts)

                {

                $object = New-Object –TypeName PSObject;

                $object | Add-Member -MemberType NoteProperty -Name ServiceName -Value $dependency.DisplayName;

                $object | Add-Member -MemberType NoteProperty -Name Enabled -Value $dependency.Started;

                if ($dependency.startname.contains('@'))

                {

                $accountinfo = $dependency.startname.split('@')

                $username = $accountinfo[0]

                $domain = $accountinfo[1]

                }

                else

                {

                $accountinfo = $dependency.startname.split('\')

                $username = $accountinfo[1]

                $domain = $accountinfo[0]

                }

                $object | Add-Member -MemberType NoteProperty -Name Username -Value $username;

                $object | Add-Member -MemberType NoteProperty -Name Machine -Value $ComputerName;

                $object | Add-Member -MemberType NoteProperty -Name Domain -Value $domain;

                $object | Add-Member -MemberType NoteProperty -Name DependencyType -Value 'Powershell Script';

                $object | Add-Member -MemberType NoteProperty -Name AccountStatus -Value 'Expired';

                $dependencyaccounts += $object

                $object = $null

                }

                return $dependencyaccounts;

                }

                throw "Error - no service accounts found"

                return $null

                # args: $target
Task Three: Creating Scan Templates
The second task is to create scan templates for each object to be discovered. Scan templates define the types of objects that can be retrieved by discovery scanners. The goal of discovery scanning is to retrieve the following:
- Accounts that can be imported and managed as secrets.
- Entities (dependencies) requiring knowledge of password changes to managed secrets.
The process of finding these accounts and entities usually involves running the following scans beforehand:
-
Host ranges where machines containing accounts can be found.
For Active Directory, this usually involves scanning a domain for organization units or defining which organization units in a domain to check. For Unix and ESXi, this usually involves defining one or more lists of IP address ranges to scan.
- Machines to be scanned for accounts.
Each of these items—host ranges, machines, accounts, and dependencies—is defined by a scan template. The scan template specifies:
- At which step of the scanning process the item is created (scan type).
- The scan template from which the current template gets its required fields (Parent scan template).
- A list of fields that the item contains.
The Fields section describes the list of properties that will be returned by the built-in scanner or script for the item. At a minimum, you need to define one field for each of the fields on the parent scan template. For items that are returned from a script, you can define additional fields that the script will return on the object. These are mapped by name to the corresponding field on the scan template. These additional fields can then be used by future scanners.
Verify Privilege Vault defines scan templates for all of its built-in scanners. Whenever possible, you should use these as input and output sources for your scripted scanners. Create your own scan templates if you need to capture additional information as data for your scripts or if you need to use specific input and output templates on the discovery scanners to drive multiple discovery workflows on a single discovery source. For this tutorial, we will create new scan templates for the output of each of our scripts.
Host Range
The first scan template is the one that stores the results from our Host Range Scanner script. The script outputs an object with the following properties:
- Name
- ObjectGUID
- DistinguishedName
Our scan template must hence, have fields to store the values of these three properties:
-
Go to Discovery.
-
Select the Configuration tab.
-
Click the Discovery Configuration Options dropdown and select Extensible Discovery. The Extensible Discovery Configuration page appears:
-
Click the Configure Scan Templates button. The Scanner Definition page appears on the Scan Templates tab.
-
Click the Create Scan Template button. The New Scan Template page appears.
-
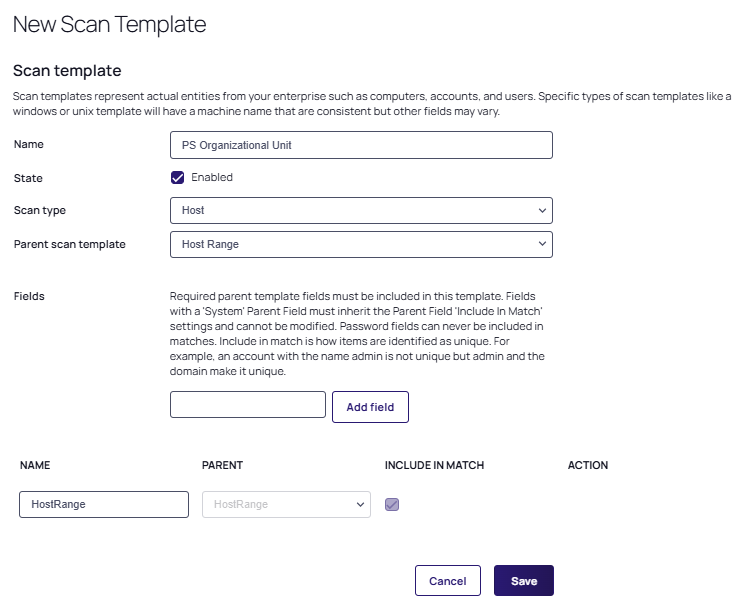
Type
PS Organizational Unitin the Name text box. -
Select the State checkbox to make the template Enabled.
-
Leave the Scan Type set to Host in the dropdown list. The Parent Scan Template dropdown appears.
-
Leave the Parent Scan Template set to Host Range in the dropdown list. A field is automatically generated for this value when selected.
-
In the Fields section, add a field for each of our script output object's properties by typing the following in the text box and clicking the Add field button:
Field Name Parent Field DistinguishedName <None> Name HostRange ObjectGUID <None> A field with the name value HostRange for the parent HostRange is automatically created and needs to be renamed to "Name":
-
When done, click the Save button.
Machines
Create the scan template to contain the output from the Machine Scanner script. This script takes the name of an OU retrieved from our previous step, scans that OU for computers, and returns a list of custom objects containing certain properties of each computer. In this tutorial we are capturing these properties:
- ADGUID
- ComputerName
- DistinguishedName
- DNSHostName
- OperatingSystem
-
Click the Create Scan Template button. The New Scan Template page appears.
-
Type
PS Machinein the Name text box. -
Select the State checkbox to make the template Enabled.
-
Set the Scan Type dropdown list value to Machine.
-
The Parent Scan Template dropdown list automatically appears, set to Computer, leave it unchanged.
-
In the Fields section, two fields automatically appear, one for Machine which needs to be renamed to "ComputerName" and another for "OperatingSystem" which will be left as is.
-
Add a field for each of our remaining script output object's properties by typing the following in the text box and clicking the Add field button:
Field Name Parent Field ADGUID <None> ComputerName Machine DistinguishedName <None> DNSHostName <None> OperatingSystem OperatingSystem -
Click the Save button.
Local Accounts
Our Local Account Scanner script takes the computer name of a computer retrieved from the previous step, scans that computer for local accounts, and returns a list of custom objects containing the following properties from each account:
- Disabled
- Name
- Resource
-
Click the Create Scan Template button. The New Scan Template page appears.
-
Type
PS Accountin the Name text box. -
Select the State checkbox to make the template Enabled.
-
Set the Scan Type to Account in the dropdown list.
-
The Parent Scan Template dropdown list automatically appears set to Account (Basic). Leave it unchanged.
-
In the Fields section, three fields automatically appear. Leave Resource and Password as they are. Rename Username as shown below.
Add a field for each of our remaining script output object's properties by typing the following in the text box and clicking the Add field button:
Field Name Parent Field Disabled <None> Name Username Password Password Resource Resource
Dependencies Scan Template
The final scan template to set up is the one used to find Windows Service dependencies. The script will return a list of all Windows Services on a computer along with account information for that service. The properties returned by the script for each service are:
- AccountStatus
- DependencyType
- Domain
- Enabled
- Machine
- ServiceName
- Username
The complete the setup:
-
Click the Create Scan Template button. The New Scan Template page appears.
-
Type
PS Dependencyin the Name text box. -
Select the State checkbox to make the template Enabled.
-
Set the Scan Type to Dependency in the dropdown list.
-
The Parent Scan Template dropdown list automatically appears set to Computer Dependency (Basic). Leave it unchanged.
-
The Account Scan Template dropdown list automatically appears, set it to PS Account.
-
In the Fields section, four fields appear automatically, leave them all unchanged:
-
Machine
-
ServiceName
-
Username
-
Domain
Add a field for each of our remaining script output object's properties by typing the following in the text box and clicking the Add field button:
-
| Field Name | Parent Field |
|---|---|
| AccountStatus | None |
| DependencyType | None |
| Domain | Domain |
| Enabled | <None> |
| Machine | Machine |
| ServiceName | ServiceName |
| Username | Username |
Task Four: Setting up Discovery Scanners and Sources
Discovery Scanners
Now that you have created the scan templates that our scripted discovery source will need, you can create the discovery scanners.
When creating a new scanner you must specify:
- Which step the scanner runs on.
- What type of base scanner to use (for example, Manual Input, Windows Discovery, or PowerShell Discovery).
- Which scan provides the input for the scan.
- Which scan template represents the output of the scan.
- When using a PowerShell base scanner, you also select what script to run and any arguments to pass to the script.
To get started:
-
Access Discovery and select the Configuration tab.
-
Click the Discovery Configuration Options dropdown and select Extensible Discovery.
-
Select the Configure Discovery Scanners button. The Scanners Definition page appears on the Scanners tab.
The page is similar to the scan templates tab page, but with a list of configured scanners displayed. Verify Privilege Vault comes with discovery scanners for each built-in scanner. Add a new PowerShell scanner for all four scanner types, using the scripts and scan templates we set up in the previous sections.
Host Ranges
-
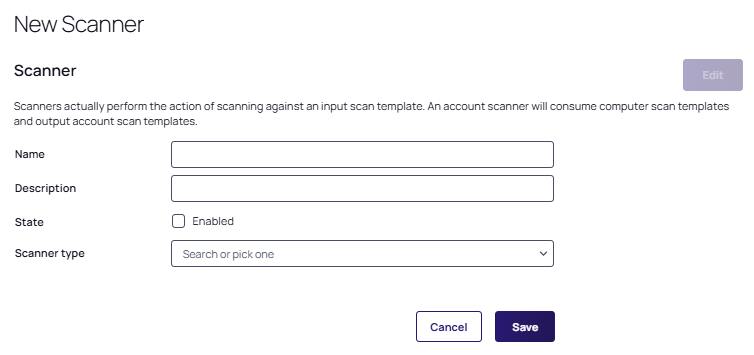
Click the Create Scanner button. The New Scanner page appears:
-
Type
PS Host Rangesin the Name text box. -
Type a description in the Description text box.
-
Select the State checkbox to make the scanner Enabled.
-
Set the Scanner Type dropdown list set to Hosts.
Discovery scanning always proceeds in the following order: Host Ranges > Machines > Local Accounts > Dependencies. The scan templates, scanners, and source pages all organize their contents in the same order.Although the discovery scanning process proceeds in the order just mentioned, it is important to realize the output of each step may not be the input of the next step. Machines take host ranges as their input, and local accounts take machines as their input, but dependencies do not take local accounts as their input. Like local accounts, dependencies are on machines, so they also take machines as their input. -
The Base Scanner dropdown list appears automatically, select PowerShell Discovery. A selection of template and other fields appears:
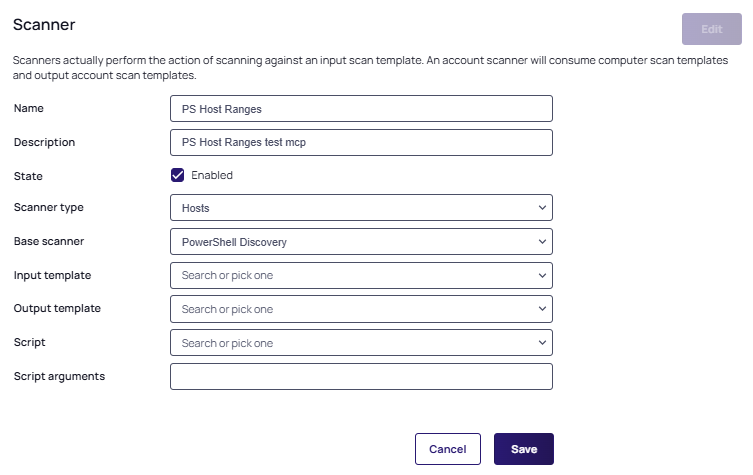 For any scripted scanner, choose PowerShell Discovery as the Base Scanner. This tells the discovery process that this scanner is running a script. Other base scanner options are available based on the discovery type. If you do not need to run a script for a specific step of discovery but do need to use a custom scan template for the input, output, or both to create a specific workflow, you can choose an option other than "PowerShell Discovery".
 -
In the Input Template dropdown list, select Active Directory Domain.
The input and output templates are where you define the information flow for the discovery process. Each scanner uses the output of a previous step as its input. Each scanner returns a list of results as its output. The input template defines what to use as the input data for the scanner. The output template defines what is returned from the scan and used elsewhere. To see what scanner consumes the output of another given scanner, look for the one that has the same input template as the original scanner's output.
You can have multiple scanners in each step with the same input template, but each scanner has to have a unique output template. When a scanner runs, it compares the results of the current scan with the results of the previous scan that was stored in the database. It updates any existing records, adds new records for new items, and removes any records that do not match items found during the current scan. If there were more than one scanner with the same output template, the second scanner would overwrite the results of the first scan, making it pointless. This is why each output template must be unique. -
In the Output Template dropdown list, select PS Organizational Unit.
This is the Host Range template we created in the previous section. Generally, each output template feeds a single scanner at the next level, but you can have multiple scanners using the same input template, with each using the results to find different things. For example, you could have two local account scanners defined that both use the input from the previous find machines step—one for finding Windows local accounts and the other for finding AD accounts that have rights on the computer. In turn, each scanner returns its results to its own output scan template—one creating Windows account secrets and the other creating Active Directory account secrets.
-
In the Script dropdown list, select Host Range Scanner, the first script you created in the previous section.
The script runs for each object matching the input template, using the arguments in the next step, to return an object defined by the output template.
-
Type the following in the Script Arguments text box, separating each with a space:
$[1]$Domain $[1]$username $[1]$Password.Script arguments can be a combination of literal values and tokens. When the script runs, these tokens are replaced with values from the input object and any privileged accounts associated with the scanner. Privileged accounts are assigned to scanners when the scanners are added to a discovery source. The table below lists the tokens that can be used as script arguments.
-
Click the Save button to save the scanner.
Table: Script Tokens
| Token | Description |
|---|---|
| $target | A generic placeholder for the input object. This is not used when scanning for host ranges because there is no previous scanner input source. For machine scanners, $target refers to either the OU (for Active Directory discovery sources) or the IP address (for Unix and ESXi discovery sources) from the host range input. For local account and dependency scanners, $target is the name of the scanned computer. |
| $[x]$Username | The username of the xth privileged account associated with the scanner. Each scanner can have one or more privileged accounts associated with it. If you need to use the username of the first privileged account in your script, you would type in $[1]$Username. The second would be $[2]$Username and so forth. You can have as many privileged accounts as necessary. |
| $[x]$Password | Similar to $[x]$Username, this is the password of the xth privileged account associated with the scanner. |
| $[x]$Domain | Similar to $[x]$Username, this is the fully-qualified domain name of the xth privileged account associated with the scanner. |
Machines
Once you set up one discovery scanner, the rest should be straight-forward:
-
Click the Create Scanner button. The New Scanner page appears.
-
Type
PS Machines Rangesin the Name text box. -
Type a description in the Description text box.
-
Select the State checkbox to make the scanner Enabled.
-
Set the Scanner Type dropdown list to Machines.
-
In the Base Scanner dropdown list that automatically appears, select PowerShell Discovery. A selection of template and other fields appears.
-
In the Input Template dropdown list, select PS Organizational Unit. This is the same as the output template from the last scanner.
-
In the Output Template dropdown list, select PS Machine. This is the Host Range template we created in the previous section.
-
In the Script dropdown list, select Machine Scanner. The script runs for each object matching the input template, using the arguments in the next step, returning an object defined by the output template.
-
Type the following in the Script Arguments text box, separating each with a space:
$target $[1]$domain. -
Click the Save button to save the scanner.
Local Accounts
Repeat the process for the local accounts scanner:
-
Click the Create Scanner button. The New Scanner page appears.
-
Type
PS Accountsin the Name text box. -
Type a description in the Description text box.
-
Select the State checkbox to make the scanner Enabled.
-
Set the Scanner Type dropdown list to Accounts.
-
In the Base Scanner dropdown list that automatically appears, select PowerShell Discovery. A selection of template and other fields appears.
-
In the Input Template dropdown list, select PS Machine. This is the same as the output template from the last scanner.
-
In the Output Template dropdown list, select Account (Basic).
-
In the Script dropdown list, select Local Account Scanner. The script runs for each object matching the input template, using the arguments in the next step, returning an object defined by the output template.
-
Type the following in the Script Arguments text box, separating each with a space:
$target $[1]$username $[1]$Domain $[1]$Password. -
Click the Save button to save the scanner.
Dependencies
Repeat the process for the dependencies scanner:
-
Click the Create Scanner button. The New Scanner page appears.
-
Type
PS Windows Servicesin the Name text box. -
Type a description in the Description text box.
-
Select the State checkbox to make the scanner Enabled.
-
Set the Scanner Type dropdown list to Dependency.
-
In the Base Scanner dropdown list that automatically appears, select PowerShell Discovery. A selection of template and other fields appears.
-
In the Input Template dropdown list, select PS Machine. This is the same as the output template from the PS Machines scanner.
-
In the Output Template dropdown list, select Computer Dependency (Basic).
-
In the Script dropdown list, select Windows Service Dependency Scanner.
-
Type the following in the Script Arguments text box:
$target. -
Click the Save button to save the scanner.
Discovery Sources
The final step is to create a discovery source and assign the discovery scanners we just made to it:
-
Select Discovery > Sources. The Discovery Sources tab loads.
-
Note the list of existing discovery sources.
If you upgraded from an earlier version of Verify Privilege Vault and have created an AD domain, a corresponding discovery source is displayed on this page. If discovery was not enabled on that domain it will appear in this list under the Disabled status. -
Click the Create dropdown button and select the Active Directory type. The Create Active Directory discovery source page appears.
-
Type in values for the Discovery source name, Fully Qualified Domain Name (FQDN), and Friendly Name parameters.
All parameters with asterisks are required. -
Select the State checkbox to make the source Enabled for scanning.
Active discovery sources are scanned at the defined discovery interval. If you have multiple discovery sources, the discovery source with the most un-scanned computers is scanned first. -
For the Discovery secret option click the No Secret Selected link. The Select Secret popup page appears.
-
Choose one of the following options:
-
Option 1: Search for and select a secret that is used as the credentials for discovery scanning and AD synchronization. These credentials must have the proper rights to scan the remote machines. The popup page closes. The name of the secret you chose replaces the No Secret Selected link.
-
Option 2: Create a new secret to be used as the credentials:
-
Click the Create New Secret link. The Create New Secret page appears.
-
Search for and choose the Generic Discovery Credentials secret template. Another Create New Secret page appears.
-
Type or select the parameters needed for the discovery operation. Parameters with asterisks are required.
-
Click the Create Secret button.
-
-
-
In the Discovery Site dropdown list, select the desired site for the discovery source.
If distributed engines are set up, the list shows all active sites. If no distributed engines are set up, the list defaults to local, and you cannot change it.
-
Select the Discover Specific OU checkbox to limit your discovery to an OU.
See Enabling Specific OU Domain Discovery to define the scanned OU. When you select this option, a Domain Scope tab appears on the Discovery Source page for the created AD discovery source. -
Leave the Machine Resolution Type dropdown list set to Use Machine and Fully Qualified Name unless you have a specific reason to change it.
-
Select the Use LDAPS checkbox to use secure LDAP for the discovery.
-
Click the Save button.
Verify Privilege Vault attempts to access the domain with your specified credentials to ensure the configuration is correct. Verify Privilege Vault must have access to the domain provided and the account credentials must work. Once the new discovery source is created it appears in the Sources tab of the Discovery page.
-
Click the newly created discovery source. The Discovery Source tab for the source appears:
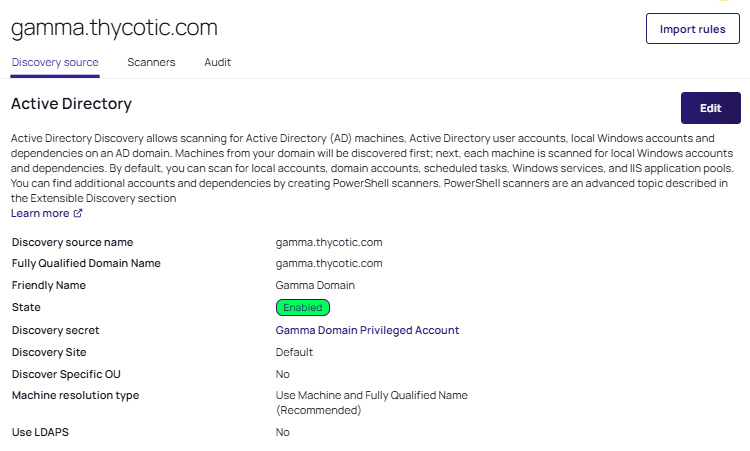
-
Access the Scanners tab. The Discovery Flow page appears, for example:
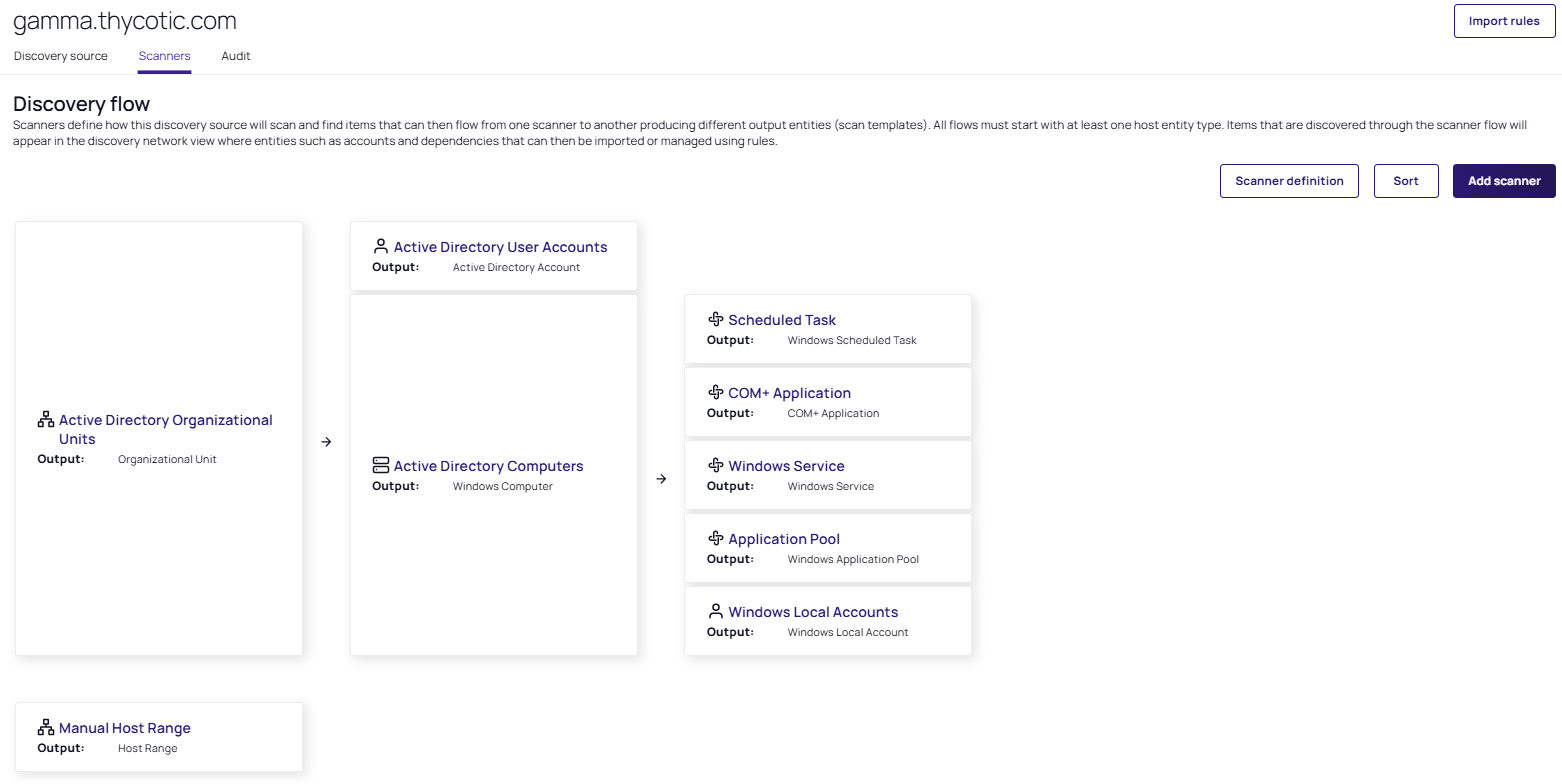 Note that a discovery source with default scanner options is already created. For this tutorial, we are not using any of those scanners.
 -
Click on each scanner, and in their details panel, which opens on the right side of the screen, select Remove Scanner. In the verification popup, click the Remove Scanner button.
-
Click the Add Scanner button. The Add Scanner popup appears. It displays by default only scanners that can be added.
-
Set the Scan Type to Hosts.
-
Add the PS Host Ranges scanner.
-
Click on the PS Host Ranges scanner to open its details panel.
-
Click Edit Scanner to make it editable.
-
Click the Add Secret link. The Select Secret popup appears.
-
Select a secret that has permissions to scan the domain, such as the account you linked to the domain when adding the discovery source.
-
Click the Save button to save your settings, and exit out of the details panel.
-
Now that you have defined the host range scanner, repeat the process for the machine scanner, PS Machines, with the appropriate secret. Repeat any advanced settings from the last scanner.
-
Repeat the process for the local account scanner, PS Accounts, with the appropriate secret. Repeat any advanced settings from the last scanner.
-
Finally, repeat the process for the dependency scanner, PS Window Services, with the appropriate secret. Repeat any advanced settings from the last scanner.
-
Your scripted discovery source is now complete. You can go to the main discovery page to run discovery followed by a computer scan.
-
When both are done, you should see identical results in your discovery network view to what you would get if you ran discovery with our built-in scanners.