Using Remote Certificate Validation with Verify Privilege Vault RDP Proxy
Configure Certificate from Trusted Source
The most correct and complete way of configuring the certificate is replacing the RDP certificate with a certificate signed by a trusted certificate authority. There are various ways to achieve this by for example manually generating certificates from a trusted source and configuring these certificates on the target machines on the RDP listener by utilizing the following command:
wmic /namespace:\\root\cimv2\TerminalServices PATH Win32_TSGeneralSetting Set SSLCertificateSHA1Hash="<thumbprint of the certificate>"
A more efficient way is to configure an Active Directory Certificate Authority, which will issue the respective certificates combined with GPO settings to reconfigure the RDS listener to utilize that was issued by the Certificate Authority. The steps to configure a Windows CA and GPO are outlined below.
Configure Windows Certificate Authority Configuration
Base requirement for deploying RDP certificates is to have a configured and functioning Microsoft Certificate Authority. Configuration of this is outside of the scope of this document.
-
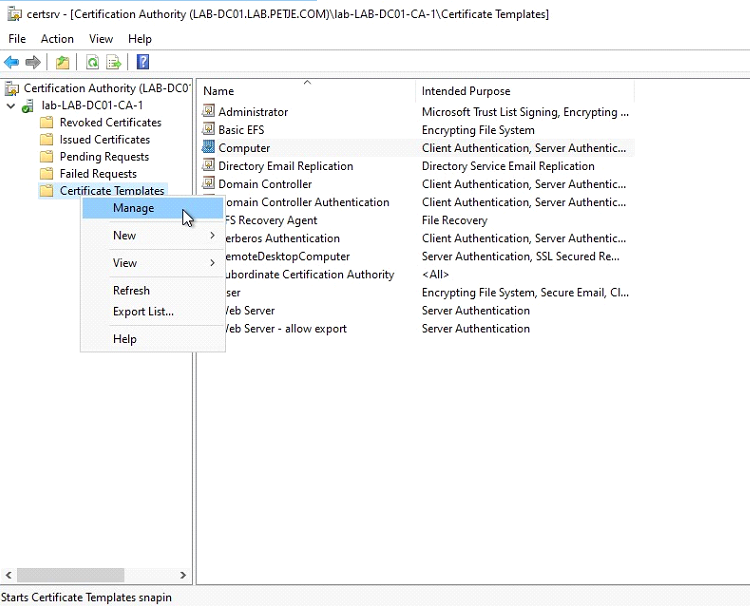
First step is to prepare a certificate template which will be used to issue RDP Certificates. To do so, open the Certificate Manager and navigate to the Management of Certificate Templates.
-
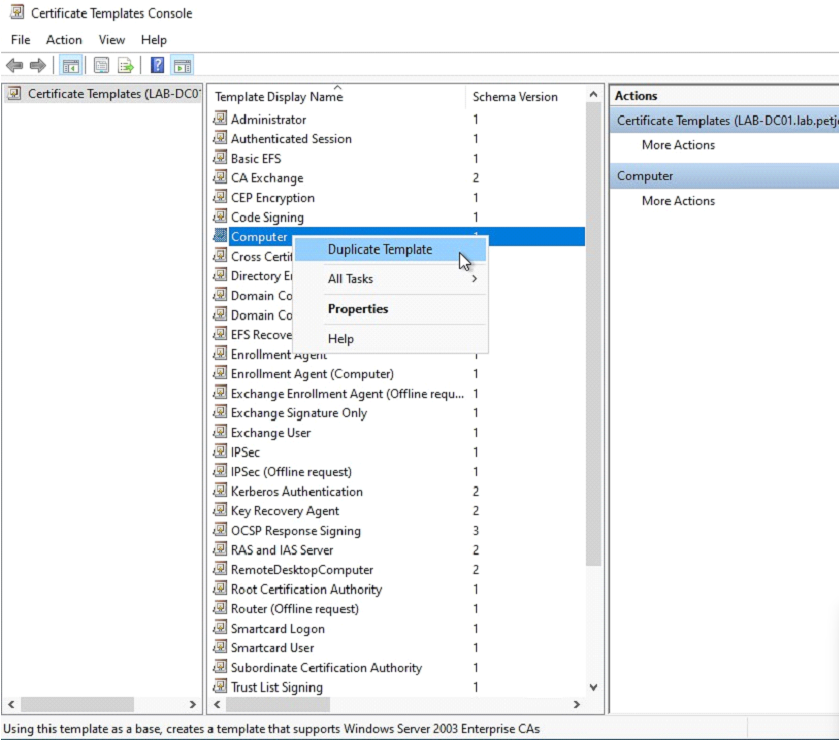
In the Certificate Templates Console, select the Computer template and duplicate this template.
-
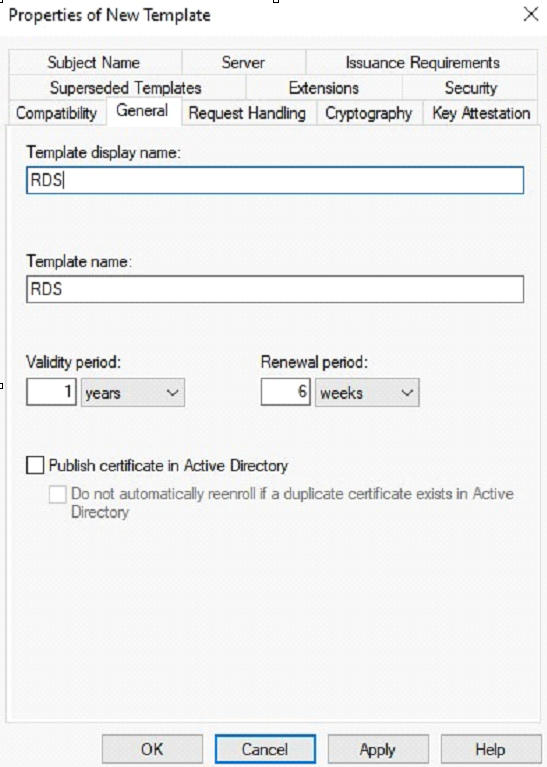
Provide a new name for the template. In the example below the name is RDS (any name can be provided). Depending on the company requirements, the validity period and renewal period can be adjusted. This however is not mandatory.
-
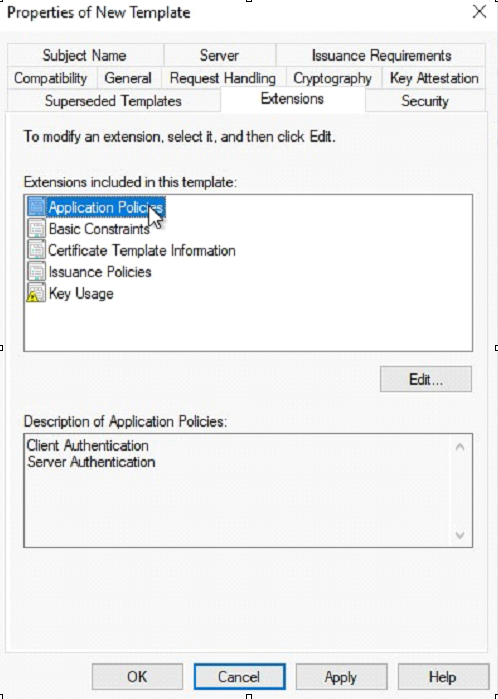
Next, configuration of the usage of the certificate needs to be adjusted.
-
Navigate to the Extension Tab and edit the application policies.
-
Make sure to configure the application policies to contain
Server AuthenticationandSSL Secured Remote Desktop. Depending of the version of Windows and configuration it is possible the SSL Secured Remote Desktop is not available. In that case, create a new application policy.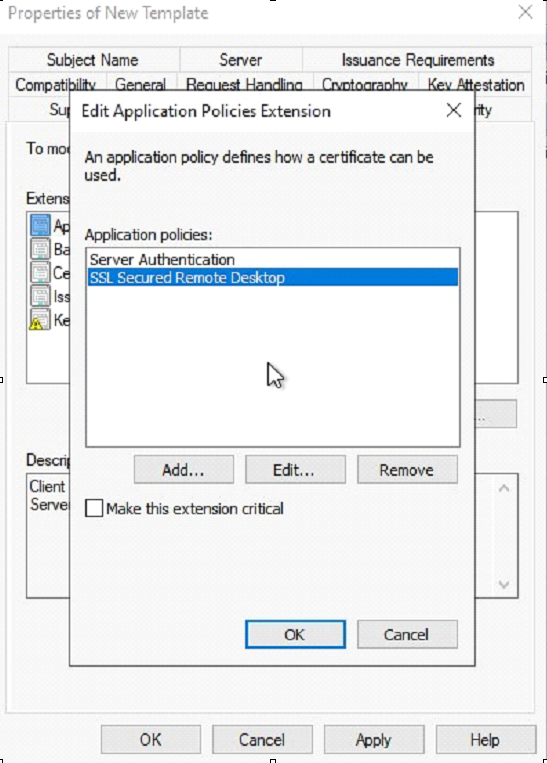
-
When adding the application policy, a list with configured policies is being showed, and the correct policies can be added as per previous step.

-
When indeed the SSL Secured Remote Desktop is not available, it can be created by pressing the New button, with the following details. The actual name is not really relevant, just make sure to name it logically as it will show on the certificate.
Name =
Remote Desktop AuthenticationObject Identifier =
1.3.6.1.4.1.311.54.1.2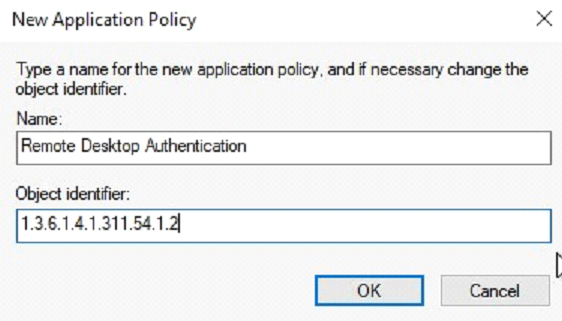
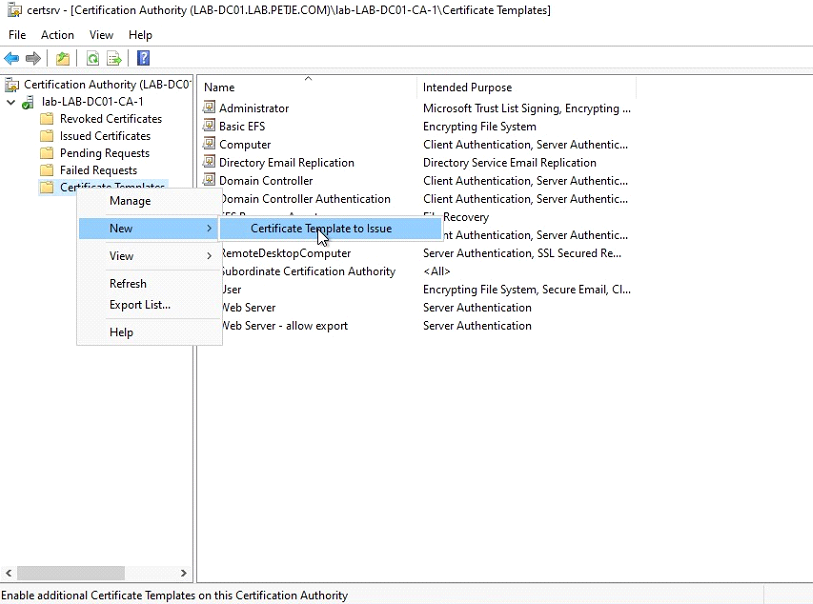
5. When the certificate template has been created it needs to be published on the Certificate Server.

-
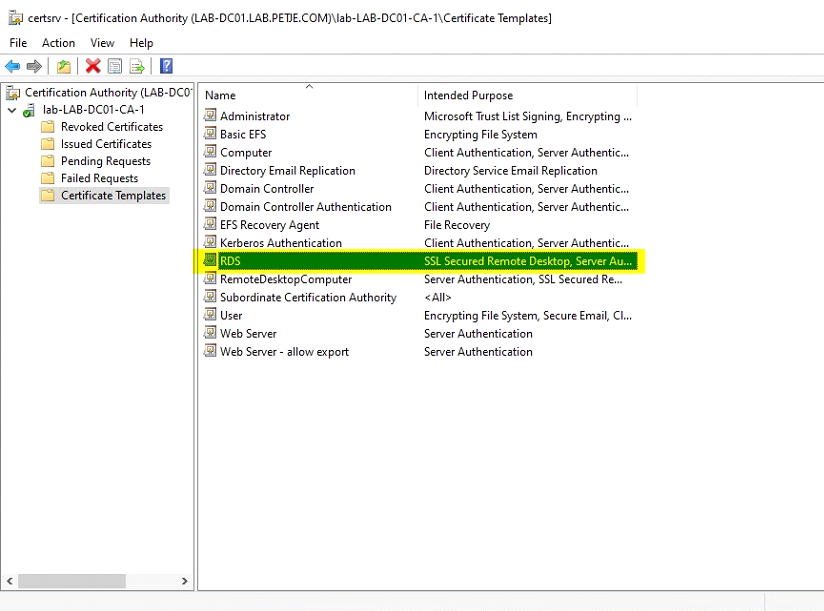
After following these steps, the created template should be available in the Certificate Templates of the Certificate Authority.
Configure GPO
Final step is to configure a GPO to have the respective machines request the correct certificate and assign that to the RDP listener. The default domain GPO can be adjusted, but a specific GPO with this setting can also be configured.
The settings are:
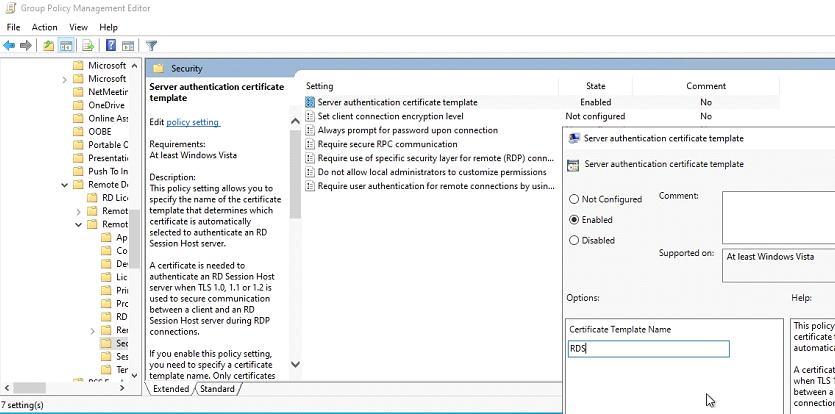
Computer Configuration\Policies\Administrative Templates\Windows components\Remote Desktop Services\Remote Desktop Session Host\Security\Server Authentication Certificate Template
Enter the Certificate Template name as configured in previous steps. In our example RDS.
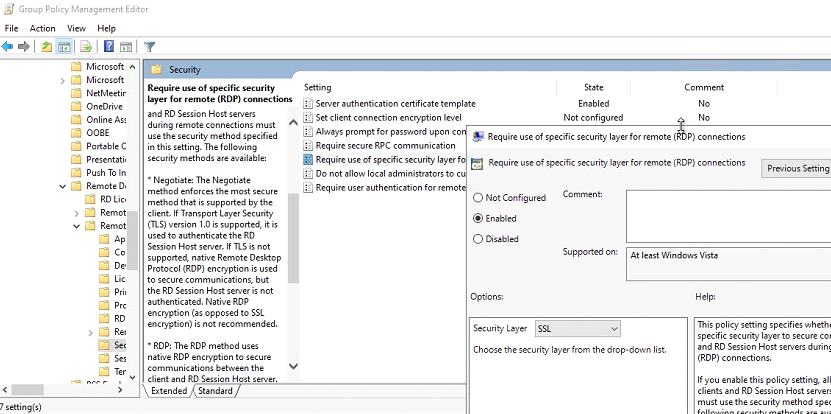
A second setting can optionally be set to force all RDP session to go over SSL. This is however not specifically required for the RDP proxy, but makes RDP connections overall more secure.
The following setting needs to be changed for this:
Computer Configuration\Policies\Administrative Templates\Windowscomponents\Remote Desktop Services\Remote Desktop Session Host\Security\Require use of specific security layer for remote (RDP) connections
Change this value to SSL.
Next, make sure to have the respective GPO assigned to the target machines in the environment.
After following these steps, Verify Privilege Vault RDP Proxy should be able to do remote certificate validation against all machines, as long as the issuing CA is trusted by the proxy.
Troubleshooting
In case of errors, make sure to look in the respective proxy logs.
When only web nodes are being used, the proxy information is logged in the Verify Privilege Vault log files that can be found in: C:\inetpub\wwwroot\SecretServer\log\ss.log.
When distributed engines are being used, the relevant log file is on the distributed engine, and can be found in: C:\Program Files\Thycotic Software Ltd\Distributed Engine\log\ssde.log.
Error codes can be converted to hex via the following site: https://www.binaryconvert.com/convert_signed_int.html
Enter the decimal error code and perform the conversion. Then search for the resulting HEX value combined with hresult.

Some examples of error codes and explanation can be found below:
-
HRESULT -2146893019 - Not a trusted authority. The certificate is issued by a certificate authority that is not trusted. Check the certificate to identify the issuing certificate authority and add that in the trusted root certification authorities store on the proxy host.
2021-01-14 09:45:00,999 [CID:] [C:] [TID:103] ERROR
Thycotic.RDPProxy.CLI.Session.ProxyConnection - Error encountered in RDP handshake for client 192.168.178.52:59642 - (null)
System.Exception: HRESULT -2146893019 (SEC_E_UNTRUSTED_ROOT) encountered:
The certificate chain was issued by an authority that is not trusted. at Thycotic.RDPProxy.SslStream2.ThrowKnownExceptions(Int32 returnCode) at Thycotic.RDPProxy.SslStream2.CompleteHandshake(String hostname, SspiPacket sspiPacket, Boolean validateRemoteCertificate)
at Thycotic.RDPProxy.SslStream2.AuthenticateAsClient(String hostname,
Boolean validateRemoteCertificate)
at Thycotic.RDPProxy.CLI.Session.ProxyConnection.
<DoHandshakeAndForward>d__15.MoveNext()
-
HRESULT -2146893022 - Invalid name on cert. Check the machine name you are connecting to and the name on the certificate. In the case of the self signed certificates it is depending if the machine is in a domain or not. When the machine is in the domain the certificate likely has the FQDN, if however the machine is in a workgroup is likely only has the machine name.
2021-01-14 10:07:58,045 [CID:] [C:] [TID:15] ERROR
Thycotic.RDPProxy.CLI.Session.ProxyConnection - Error encountered in RDP handshake for client 192.168.178.117:50535 - (null)
System.Exception: HRESULT -2146893022 (SEC_E_WRONG_PRINCIPAL) encountered:
The target principal name is incorrect.
at Thycotic.RDPProxy.SslStream2.ThrowKnownExceptions(Int32 returnCode) at Thycotic.RDPProxy.SslStream2.CompleteHandshake(String hostname, SspiPacket sspiPacket, Boolean validateRemoteCertificate)
at Thycotic.RDPProxy.SslStream2.AuthenticateAsClient(String hostname, Boolean validateRemoteCertificate) at Thycotic.RDPProxy.CLI.Session.ProxyConnection.
<DoHandshakeAndForward>d__15.MoveNext()
-
Return code -2146892983 - Incorrect usage for cert. Check the extended usage properties of the certificate that is being used on the target machine. Important is that the certificate has at least the following property: Server Authentication (1.3.6.1.5.5.7.3.1)
2021-01-13 15:32:08,086 [CID:] [C:] [TID:104] ERROR
Thycotic.RDPProxy.CLI.Session.ProxyConnection - Error encountered in RDP handshake for client 192.168.178.105:57804 - (null) System.Exception: Unexpected SSPI handshake return code -2146892983 at Thycotic.RDPProxy.SslStream2.CompleteHandshake(String hostname, SspiPacket sspiPacket, Boolean validateRemoteCertificate)
at Thycotic.RDPProxy.SslStream2.AuthenticateAsClient(String hostname, Boolean validateRemoteCertificate) at Thycotic.RDPProxy.CLI.Session.ProxyConnection.
<DoHandshakeAndForward>d__15.MoveNext()