SSH Proxy Configuration
The Verify Privilege Vault proxy routes SSH and RDP sessions and helps protect the endpoint credentials. There are two configuration options for proxying:
- Proxy through the Verify Privilege Vault Web application
- Proxy through a distributed engine
Enabling Proxy
-
Go to Admin > Proxying.
-
Enable SSH Proxying.
-
Generate a new key - click ECDSA or RSA to generate the related SSH Proxy Host Key in the SSH Proxy Host Fingerprint.
-
To enable proxying on Web nodes, under the Endpoints tab, in the Nodes section, edit the row to set the Public Host and Bind IP Address. For a standard server, these can be the same, but if the public IP of the server is not set on the server (such as a load balancer or an EC2 instance with an elastic IP), they will be different. Enter the Available Port Range if prompted.
-
To enable proxying for a specific site and all engines within that site, edit the row in the Sites: section. In the Update Proxy Configuration For Site popup specify:
-
Enable SSH Proxy: Check to enable SSH Proxy.
-
SSH Proxy Port: Specify the related SSH Proxy Port if prompted.
-
Inherited (Port 22): Check to enable the defaulted Port 22.
-
Available Port Range: Specify the range of the available ports.
-
Enable RDP Proxy: Check to enable RDP Proxy. See RDP Proxy Configuration for more details.
-
RDP Proxy Port: Specify the related RDP Proxy port if prompted.
-
Inherited (Port 3390): Check to enable the defaulted Port 3390.
-
-
The engines for the sites are listed in the Engines section below. The Public Hostname or IP Address is the public host or IP the launcher connects to and the Bind IP Address is the IP on the server that the SSH proxy is listen on. Again, these will typically be the same, but may be different if the resolvable IP or host of the engine machine is different than the IP on the network adapter on the machine.
-
Enable proxying on a secret with a PuTTY launcher. The launcher now connects to the assigned site, which is set on the General tab. If the site has proxying enabled, it will go through the engines available in the site, otherwise it will use the Verify Privilege Vault Web application proxy.
Web Application Proxy Performance
Minimum Hardware
- Intel 3.7 GHz Quad Core
- 16 GB of RAM
- 100 MB/s plus network capability
Session Activity
We tested sessions with standard usage, such as opening and modifying files and navigating the file system on Linux. On Windows, the activity was opening MMC snap-ins, editing files, and copying files through the RDP session. If you have constant large file transfers across multiple concurrent sessions or otherwise transferring large amounts of data (such as streaming a video through an RDP session), the maximum concurrent sessions will be significantly reduced.
Table: Concurrent Proxy Sessions
| Protocol | Concurrent Sessions |
|---|---|
| SSH | 300 |
| RDP | 100 |
Note that the file transfer speeds when using SSH Proxy with tools such as FileZilla or WinSCP in Secret Server may be slower than direct, non-proxied transfers. Recent improvements have enhanced transfer speeds compared to previous performance; however, some degradation is still expected due to the nature of the proxying process.
For optimal performance:
- Ensure your network connection has low latency and sufficient bandwidth.
- Consider alternatives for large file transfers, such as direct SCP commands or other non-proxied methods, if proxying is not essential for your use case.
This behavior is inherent to the security and architecture of the SSH Proxy feature and is not indicative of a system malfunction.
Proxy Connections
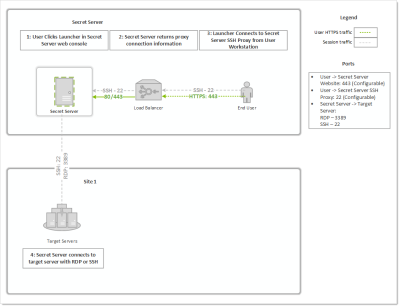
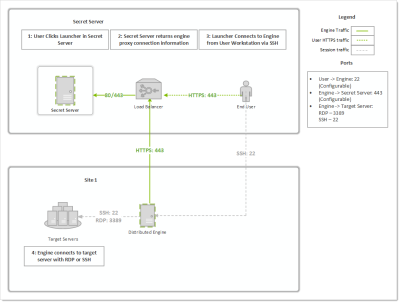
Connections from the user to the proxy are over SSH, and you can configure the port. The user's machine will connect to either an engine SSH proxy or the Verify Privilege Vault Web application SSH proxy.
Figure: Default Verify Privilege Vault Web Application Proxy (example)
Figure: Proxy through a Distributed Engine (example)
SSH Proxy with Multiple Nodes
If you are using clustering with Verify Privilege Vault, you can pick exactly which of your nodes act as a SSH proxy by going to the Admin > Proxying page and scrolling down to the Nodes section. For each node you wish to be a proxy, configure the SSH Public Host (must be an IP address, not a DNS name) and the SSH Bind IP Address (use 0.0.0.0 to easily bind to all IPv4 Ps on a server). There is no need to configure all nodes if you do not want them all to be proxies.
As soon as the IPs are saved for each node, the node should start listening on the SSH proxy port. You can verify that with netstat. If you do not see the node listening on your chosen port, perform an IIS reset and hit its Verify Privilege Vault website. It should be listening once Verify Privilege Vault starts up again. For example:
C:\Users\Administrator>netstat -ano | find ":22"
TCP  0.0.0.0:22  0.0.0.0:0  LISTENING  3600
Now, when a user connects to the Verify Privilege Vault Web page, if the node they are hitting is setup to be a SSH proxy, they will connect to that node's SSH public host IP. If the node they are connected to is not setup to be a SSH proxy, then users will round robin between the other nodes that are SSH proxies and connect to their SSH public host IP.

