Remote Password Changing for WebSphere
With Remote Password Changing (RPC), secrets can automatically change remote account passwords on a schedule, upon check-in, or explicit user request. The complexity requirements for the password are user-configurable.
IBM WebSphere is a suite of enterprise application and integration middleware, with WebSphere Application Server (WAS) as its core offering. It provides a runtime environment for deploying and managing Java-based applications and services. WebSphere can be run on-premises or in cloud environments, supporting scalability, clustering, and centralized administration.
In WebSphere RPC, accounts can change their own password, or the password can be changed using privileged credentials. See the Password Changer List for a complete list of available password changers.
Prerequisites
WebSphere can run in two main deployment models:
-
On-premises (local install)
-
Traditionally, the IBM WebSphere Application Server (WAS) is installed on local servers (Windows, Linux, AIX, z/OS, etc.).
-
Verify Privilege Vault connects to those servers (directly or via a distributed engine) to perform remote password changes against service accounts, application users, or underlying OS/LDAP accounts.
-
-
Cloud-based offerings
-
IBM also provides the WebSphere Hybrid Edition and WebSphere Liberty on IBM Cloud.
-
In such cases, the WebSphere runtime is provisioned in the cloud but can still integrate with the distributed engine in Verify Privilege Vault, provided network connectivity exists between them. Additionally, always ensure that the machine hosting WebSphere can communicate with the distributed engine:
-
For Linux, SSH connectivity is required.
-
For Windows, a PowerShell setup and connectivity is required.
Without proper connectivity, secret integration between WebSphere and the distributed engine will fail.
-
-
If the cloud WebSphere instance sits behind restricted access, you may still need a distributed engine deployed in a cloud VPC/subnet to handle RPC.
-
-
User credentials to access Verify Privilege Vault.
-
Heartbeat monitoring and Remote Password Changing enabled in Verify Privilege Vault.
-
A distributed engine from which to make the connection.
This is always required in cloud, but for on-prem Verify Privilege Vault, a DE is one of two options available. The other is connecting directly, appropriate for small networks, using Local site.
Configuration for Remote Password Changing
When a password is changed manually or by RPC, a Heartbeat is queued to determine if the credentials in the secret are valid. The heartbeat status shows Pending while the process executes. When the heartbeat completes the status will change to either Success or Failure. Success means the credentials in the secret are valid.
-
Log into Verify Privilege Vault.
-
Install a distributed engine onto a site (“Default” for this procedure).
-
Navigate to All secrets.
-
Select the Create secret button. The Create new secret popup appears.
-
Search for one of the two WebSphere secret templates.
-
If you select the Websphere Account template, the popup refreshes automatically to reflect the following fields:
-
Secret name: give the secret an appropriate name.
-
MachineName: The name of the WebSphere Machine.
-
Username: The username of the WebSphere account.
-
Password: The password of the WebSphere account.
-
Site: The container in which heartbeat, RPC, and other secret activities occur.
-
Auto Change Enabled: When enabled, this secret will be set to expire on a schedule and change the password. After creation view the RPC tab for details.
-
Click Create Secret to save your changes.
If you only require a non-privileged secret, configuration is complete after creating the secret as shown in step 5a. HB and RPC will run using the secret’s own credentials.
-
-
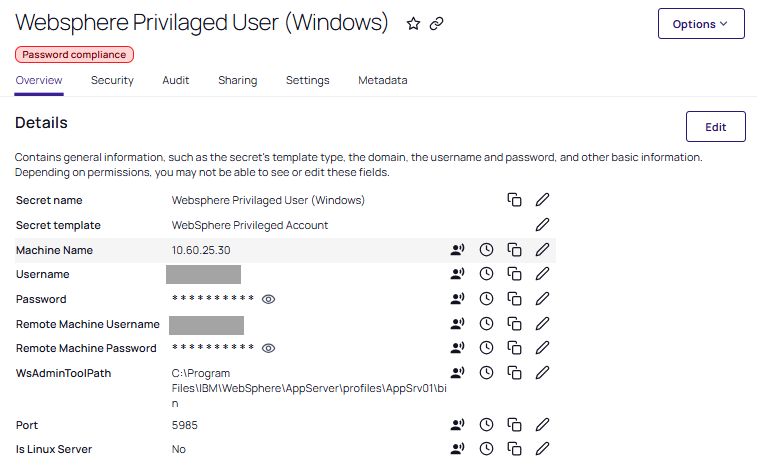
If you select the WebSphere Privileged Account template, the popup refreshes automatically to reflect the following fields:
-
Secret name: give the secret an appropriate name.
-
MachineName: The name of the WebSphere Machine.
-
Username: The privileged username of the WebSphere account.
-
Password: The privileged password of the WebSphere account.
-
Remote Machine Username: The username of the WebSphere machine.
-
Remote Machine Password: The password of the WebSphere machine.
-
WsAdminToolPath: The path of the WebSphere ws admin.
-
Port: The port of the WebSphere ws machine.
-
Is Linux Server: RPC running on the Linux Server. Requires a yes or a no.
-
Site: The container in which heartbeat, RPC, and other secret activities occur.
-
Click Create Secret to save your changes.
Be sure to add default port number 22 for Linux (SSH) and 5985 for Windows (PowerShell).For this example, we'll be using the second template.
-
-
-
Access of the secret you created using the WebSphere Privileged Account template.
-
Select the Remote Password Changing tab.
-
For the RPC / Autochange section, select Edit.
-
For Change password using set Privileged account credentials.
If a secret’s password is valid, it can use itself to change its own password. If a secret’s password is not valid, then the secret cannot be used to authenticate in order to perform the password change. -
Click no secret selected.
-
Choose the secret you created previously. The password change command will be run as the privileged user listed here.
This allows the password change to run as the privileged user, ensuring RPC succeeds even if the secret’s password is invalid. This configuration allows for takeover, where Verify Privilege Vault enforces the authoritative password, similar to the how a super user functions. -
Select Save.
-
On the Overview tab, the last heartbeat status becomes Pending again until the RPC completes.
-
You can skip the wait time by navigating to Settings > Password Change Log.
-
Select Run RPC Now to launch the process immediately.
When RPC is complete a banner will briefly appear at the bottom of the page indicating success or failure. If you miss it the result can be seen in the password change log list.
-