AWS Key Management in Verify Privilege Vault Cloud
Introduction
Verify Privilege Vault protects your secrets using a master encryption key, as well as an additional intermediate encryption key that is unique for each secret. These effectively act as internal passwords that Verify Privilege Vault itself needs to unlock your data, for example any time you view or update a secret.
Key Management in Verify Privilege Vault Cloud (SSC) allows you to add an additional layer of encryption using a third-party provider to protect these encryption keys for added protection and control. To do this, you must first set up your own encryption key with a third party that you fully control, and then provide Verify Privilege Vault limited access to it. This external encryption key is used to protect the Verify Privilege Vault encryption keys. You can revoke Verify Privilege Vault's access at any time if the need arises, rendering Secrets unusable.
You can change your key management configuration through Verify Privilege Vault's Web interface or by using the REST API. If key management has already been enabled, you can switch to a new configuration or disable key management completely. To make any change, your existing key management configuration must still be valid, so your secrets and the master encryption keys can be converted to the new configuration. Your new settings are validated before they can be saved.
Verify Privilege Vault Cloud currently supports Amazon's Key Management Service.
Amazon Key Management Service
Key Management Service (KMS) is a managed service provided by AWS that allows you to create, manage and use encryption keys for your applications and services. With KMS, you can create symmetric keys or asymmetric keys to encrypt and decrypt data. These keys can be used to protect sensitive data such as passwords, credit card numbers, or personally identifiable information (PII).
A KMS (Key Management Service) key is a cryptographic key used to encrypt and decrypt data stored in AWS (Amazon Web Services) services such as S3, EBS, or RDS. KMS keys are stored securely in the AWS Cloud, and you can control access to them by using IAM (Identity and Access Management) policies. You can also use KMS to audit key usage and generate key usage reports.
Configuring Key Management
To enable key management, you will first create an encryption key with your third-party provider, then an API account that Verify Privilege Vault will use in order to access the key. After the external encryption key is setup, you will update Verify Privilege Vault with the details.
Navigate to Verify Privilege Vault's key management page by clicking Admin > All > Key Management.
Here you can change your key management settings, as well as view the audit history showing all key management updates.
Key Management Providers
Verify Privilege Vault Cloud currently supports one provider, AWS Key Management Service. More providers may be added over time. Azure's KeyVault service is not a viable provider at this time due to slow speed limits when using strong encryption keys (such as 4096-bit RSA with HSM).
AWS Key Management Services Pricing
Please see AWS Key Management Service Pricing.
Verify Privilege Vault Cloud requires one AWS Key ("CMK"), and the number of requests per month will vary depending on how often secrets are accessed.
Procedure
Task 1: Setting up the Encryption Key and IAM User in AWS
-
Log into the AWS Console website at https://console.aws.amazon.com/.
-
Under Services, search for IAM (Identity and Access Management). This is where you will configure both your encryption key and an IAM user for Verify Privilege Vault to use to access the encryption key.
-
Click the Users button on the left menu.
-
Click Add User button.
-
Type a name (such as SecretServerCloud) in the User Name text box.
-
Click to select the Programmatic Access check box in the Access Type section.
-
Click the Next: Permissions button (on the Permissions page, no special permissions are needed). The Permissions page appears.
-
Click the Next: Tags button. The Tags page appears.
-
Click the Next: Review button (on the Permissions page, no special permissions are needed). The Review page appears.
-
Click the Create User button. A Success page appears confirming the user was created. Both the access key ID and the secret access key appear (click the Show link).
-
Click the Download .csv button to save the credentials
Important: Be sure to save both the access key ID and the secret access key! If you lose them, you can never view the secret access key again. Even after you enter them in Verify Privilege Vault Cloud, you cannot retrieve the secret access key.
-
Once the download completes, click the Close button.
-
Under Services, search for Key Management Service.
-
Click the Customer managed keys link in the left menu.
-
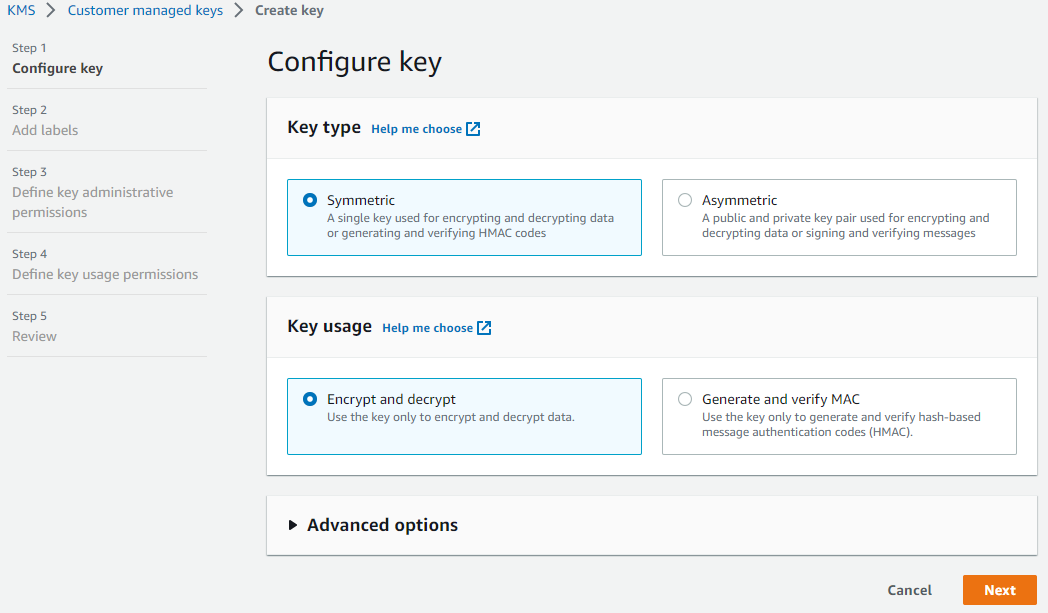
Click the Create Key button. The Configure Key page, the first page of the Create Key wizard, appears:
-
Ensure the Key type selection button is set to Symmetric.
-
Ensure the Key usage selection button is set to Encrypt and decrypt.
-
Click the Next button. The Add Labels page appears:

-
Type
SecretServerCloudin the Alias text box. -
(Optional) Type a description in the Description text box.
-
(Optional) Click the Add tab button to add KMS tags. Click the Learn More link for more about tags.
-
Click the Next button. The Define Key Administrative Permissions page appears:
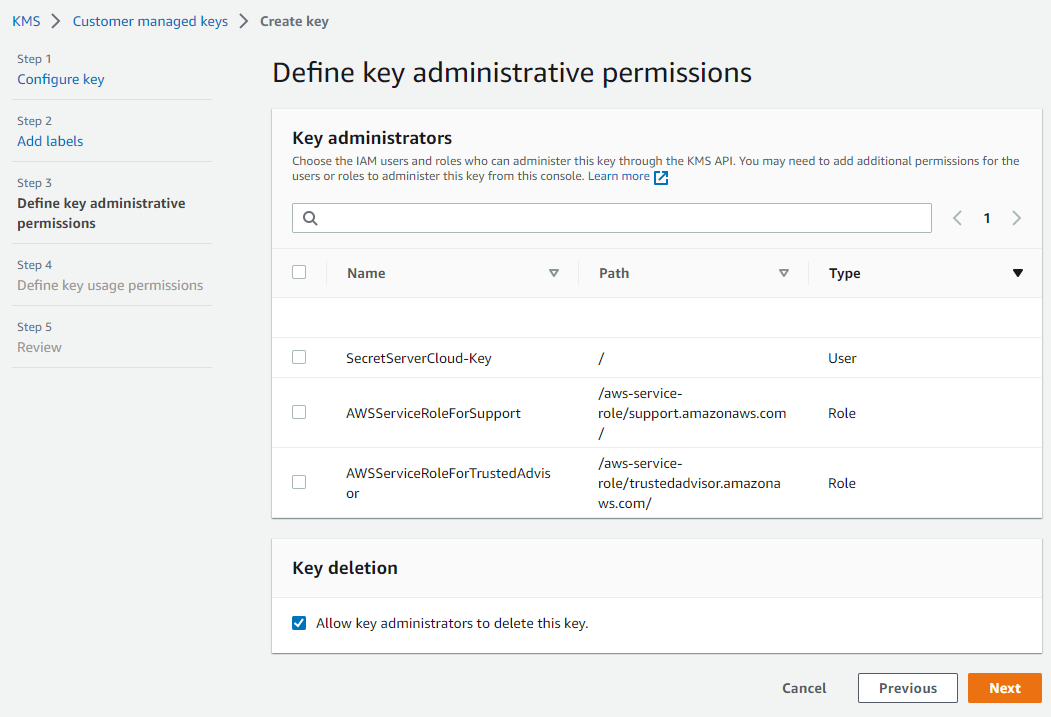
Leave the page as is.
-
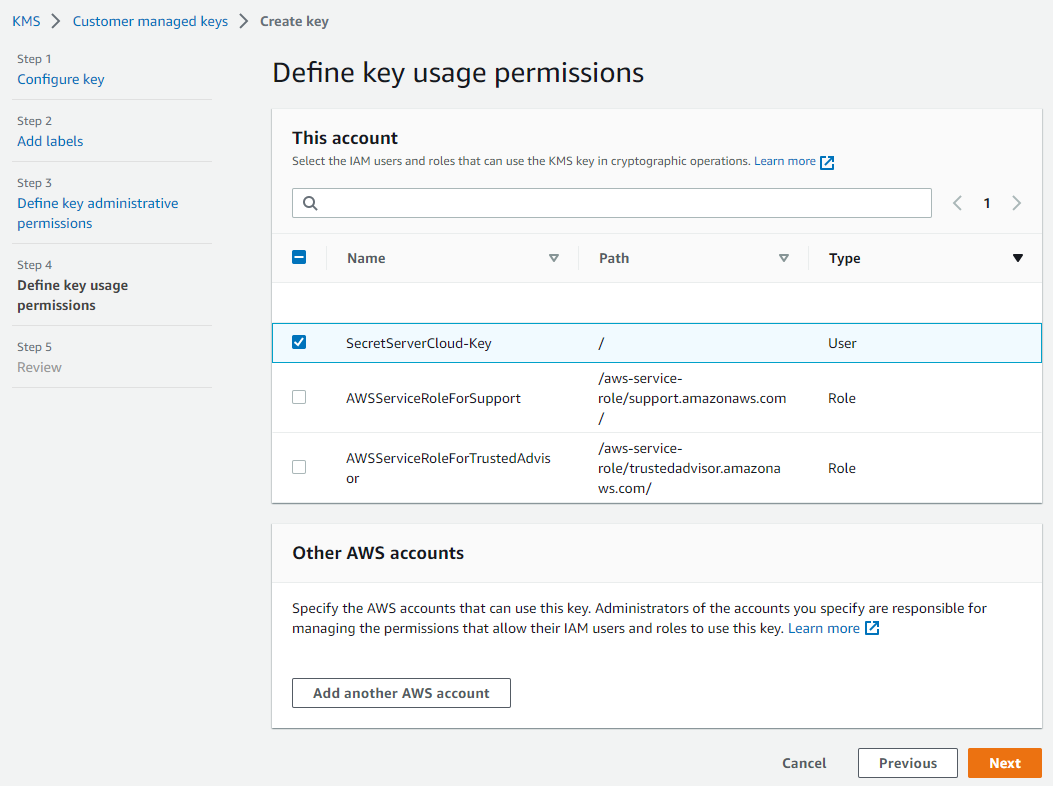
Click the Next button. The Define Key Usage Permissions page appears:
-
Click to select the check box next to the SecretServerCloud-Key name in the table to give that user access to the key.
Important: Do not give access to the user you created earlier for Verify Privilege Vault Cloud. It is unnecessary for Verify Privilege Vault to have administrative access to the key.
-
Click the Next button. The Review page appears:

-
Ensure the settings are as desired.
-
Click the Finish button. The new key appears in your Encryption Keys list.
-
Click to select the new key in the list. The Summary section on the key's page appears.
-
Copy and save the contents of the read-only ARN text box. You will need it later.
Task 2: Adding Encryption Key and User Details in Verify Privilege Vault
-
In Verify Privilege Vault Cloud, go to Administration > Key Management. The Key Management page appears.
-
Click the Edit button. The page becomes editable.
-
Click the Key Management Type dropdown list to select Amazon KMS.
-
Type your AWS key details that you saved earlier in the remaining four text boxes.
-
Click the Save button.
Task 3: Secret Key Rotation
-
Once you save your changes, your new settings are validated and a secret key rotation is triggered.
-
View the progress of the rotation:
- Go to Admin > Configuration.
- Click the Security tab.
- Go to the Key Rotation section.
-
Later you can repeat the process to change the AWS encryption key, or you can select None for the Key Management Type to disable it completely.
Verify Privilege Vault Key Management via the REST API
Verify Privilege Vault Cloud has a REST API for retrieving or updating your key management configuration. For details:
-
Log on your Verify Privilege Vault Cloud instance.
-
Click the question mark icon in the top right corner and select Verify Privilege Vault REST API Guide.
-
Click on the Documentation for REST API document link for your authentication style, normal tokens or Windows Integrated Authentication.
-
Search for
KeyManagementto view that section of our API.
Important: When changed via the API, maintenance mode and a secret key rotation still occur.