Step 2 - Download the Command Line Interface (CLI)
Video Guide
Windows Guide
Linux Video Guide
Procedure
-
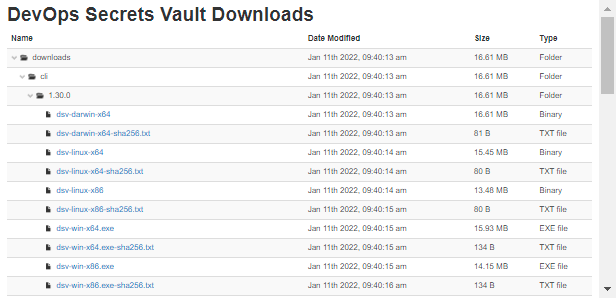
Go to the Verify Privilege DevOps Vault Downloads page. Locate the most recent CLI executable for your platform.
Once installed, periodically check the download site for updates and inform the user if an update is available.
-
Install the dsv executable onto the workstation.
Windows and macOS - Download the executable file onto each of the workstations that will operate Verify Privilege DevOps Vault. Locate the executable in your downloads folder. The file name will reflect the OS and 32-bit or 64-bit architecture.To simplify command entry, Rename the executable to "dsv" (macOS); "dsv" or "dsv.exe" (Windows). Place the executable in the file directory location of your choice and note the path.
Linux - Copy the dsv executable file, open a shell window and use the `curl` command to download the file. Do the same for the hash file.
-
Check the hash for the dsv executable you downloaded, in order to ensure that there are no issues with the file and that the file is not corrupt.
Windows - In a Command window, type
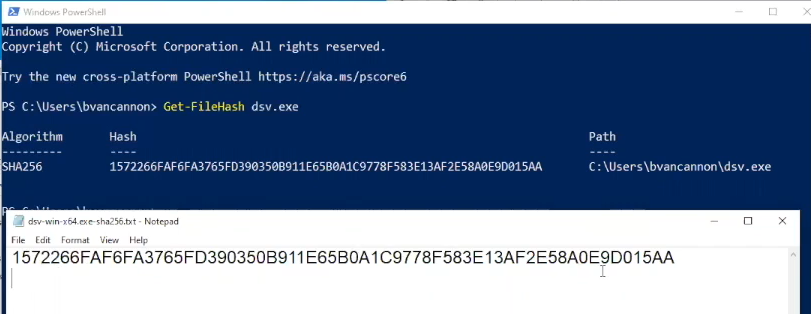
Get-FileHash dsv.exein the directory where your executable resides and observe the Hash code in the response. The Hash code should match the code obtained when you open the executable file (see example).macOS and Linux - Then, run the
sha256sumcommand to check the hash for the dsv executable you downloaded. Next run thecatcommand to catalog the hash file. Ensure the hash codes match to ensure that there are no issues with the file and that the file is not corrupt. -
Windows and Linux Only - Change permissions on the dsv executable using the `chmod` command.
-
Add the executable path to the Environment Variable. Adding the location of the executable to your environment variable enables you to invoke `dsv` without specifying its path or having to pre-pend `.\`
Setting a new path requires a system restart.
-
For Windows, press the Windows key and type edit environment variables. At the Environment Variables dialog, locate the System Variables (or under User Variables, if you want make it available only in the context of that user), select Path, click edit, and add the path to the dsv executable (example: C:\Users\<name>\). Click OK.
-
For macOS, open Terminal. Run
touch ~/.bash_profile; open ~/.bash_profile. In TextEdit, add the path to the dsv executable toexport PATH=". Save the . bash_profile file. -
For Linux or macOS, use export to modify the shell profile file, ~.profile or ~.bash_profile typically, so that it adds dsv to the PATH on system startup:
export PATH=~thycotic/cli:$PATH.
-
-
Enable Autocomplete. Autocomplete is supported for bash, zsh, and fish shells only. To turn on Autocomplete for the CLI, run
dsv -installand restart your shell. Now when you type out the beginning of a command such asdsv sand hit tab. The command automatically updates todsv secret.Autocomplete also helps with expanding the secret path on
dsv secret read. Put in the beginning of the path, such asdsv secret read resourcesand hit tab to get the next part of the path. If there are multiple matching sub-paths, hit tab twice to print out the available options.For example: typing
dsv secret read resources/us-east-and hitting tab twice will show the output of any secrets below that path, such as resources/us-east-1/server resources/us-east-2/server.Proceed to Step 3 - Initialize the Command Line Interface (CLI).


